

Field Notes: Week 12
Here’s what I seeded this week:
Stock - Iron Rose, Iron Apricot and Iron Yellow (I only grow the Iron varieties nowadays)
Dusty Miller - New Look (I love this stuff but it’s finicky in the vase. We’ll see how much I actually use)
Ammi - Dara
Atriplex - Copper and Red
Frosted Explosion (an amazing ornamental grass)
Statice - Blue, White, Apricot, Rosyred (new color!!)
Artemesia - Sweet Annie
Tomatoes - Sungold (my absolute favorite), Edox, Sakura, White Cherry, Chocolate Pear
Dahlias - planted the remainder of my dahlia tubers to equal 150 plants. Have some tubers left over. But my house is full.
Just about ready to transplant plants from a couple of weeks ago!
Came home from a weekend in Talkeetna to find an entire tray of seedlings all dried out!! NOOOO! Luckily they perked right up.

Half my dahlias are up and under the lights!
Field Notes: Week 10
March 8-14
I started my first round of seeds on March 9th. Everything this early goes into 3/4” soil blocks. Here’s a list of what I seeded with corresponding quantities:
Monarda-Panorama Red (40)
Oregano (40). 3-5 seeds per block
Sage (40)
Rosemary (40). Would have seeded thyme but realized I didn’t have thyme seeds. Ugh, something like this happens every year!
Eucalyptus-Lemon Bush (60). There was a seed shortage/failure of 3 other eucalyptus vareiteis so I am only able to grow Lemon Bush this year. Hope it’s awesome as I’m in love with eucalyptus.
Verbascum-Rosetta (20). NEW VARIETY. Trialing this!
Snapdragons-Potomac Cherry, Potomac Appleblossom, Potomac Ivory, Potomac Royal (40 each)
Gomphrena-QIS Carmine (10), Audray White (60). Looking forward to growing these again after a few years off.
Dahlias-a whole buch of varieties (75)
Aside from dahlias, all plants are on a heat mat and under a light. Dahlias are in either a gallon pot or a 4” pot depending on tuber size.


Seed starting set up on the left. I have one shelf with lights so far! On the right, seeds have germinated! Ones in front are looking a bit leggy: need to lower my lights.

Best of 2020 - Part 2: My Absolute Favorite Flowers of 2020
Ben Huston is one of my absolute favorite dahlia varieties. It makes my heart go “boom” every time.
Every year I grow new varieties to test and then report back on what I absolutely loved. Since I also have a small growing space I have to ruthlessly cut anything that doesn’t preform well.
I’ve looked over what I grew in 2020 and am pleased to say the below flowers made my “Best of 2020” list.
Saponaria - Pink Beauty. A nice early bloomer to fill vases early in the summer. Harvest when the first buds are open. The remaining buds on the plant will slowly open in the vase which gives you a nice long lasting cut flower. Needs staking in the garden or wind and rain might topple it.

Saponaria is the pink airy flower with the green buds that is arranged horizontally.
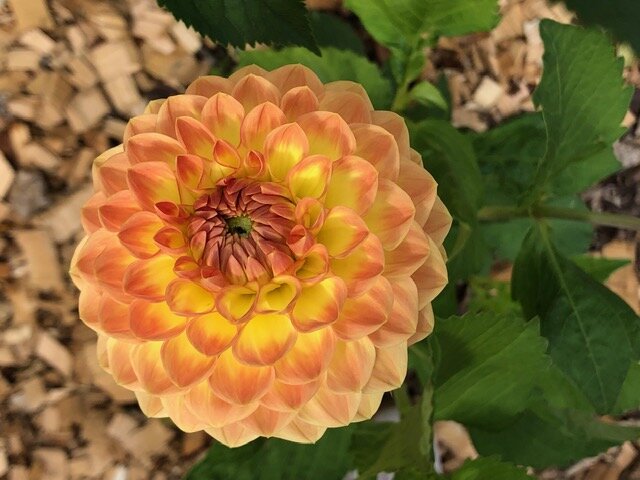
Strawflowers - Copper Red, Purple Red, Vintage White. These are so magical! How can I pick just one?!
These are 3 that I LOVED. A long lasting, magical and whimsical cut flower. Blooms dry great but they need to be wired as stems become weak with drying. Best of all they are super easy to grow! So if you’re new to growing flowers, start with these.

Copper Red Strawflower
Eucalyptus - Silver Drop & Silver Dollar. I first tried these last year and fell in love. Adds texture and interest to any flower garden.
I am also pleased to say that they looked amazing in pots! Plus they are relatively frost hardy, so mine looked great through October.
Be sure to start these guys early under lights as they are slow to grow!
Statice - QIS Apricot. The designers who bought from me this year absolutely LOVED these. The color is one-of-a-kind. And the tiny whorls of blooms create a nice textural element. Plus they pretty much last forever once dried!
Scabiosa - Black Knight. Every year I grow these. And every year I LOVE them more.
Unfortunately germination can be spotty, so I didn’t have a lot of blooms this year. Planting way more next year. They are true magic.
Grass - Frosted Explosion. Oh wow! Such an ethereal addition to the garden. An airy-fairy grass that looks awesome in the vase and dries amazing.

Scabiosa - Black Knight
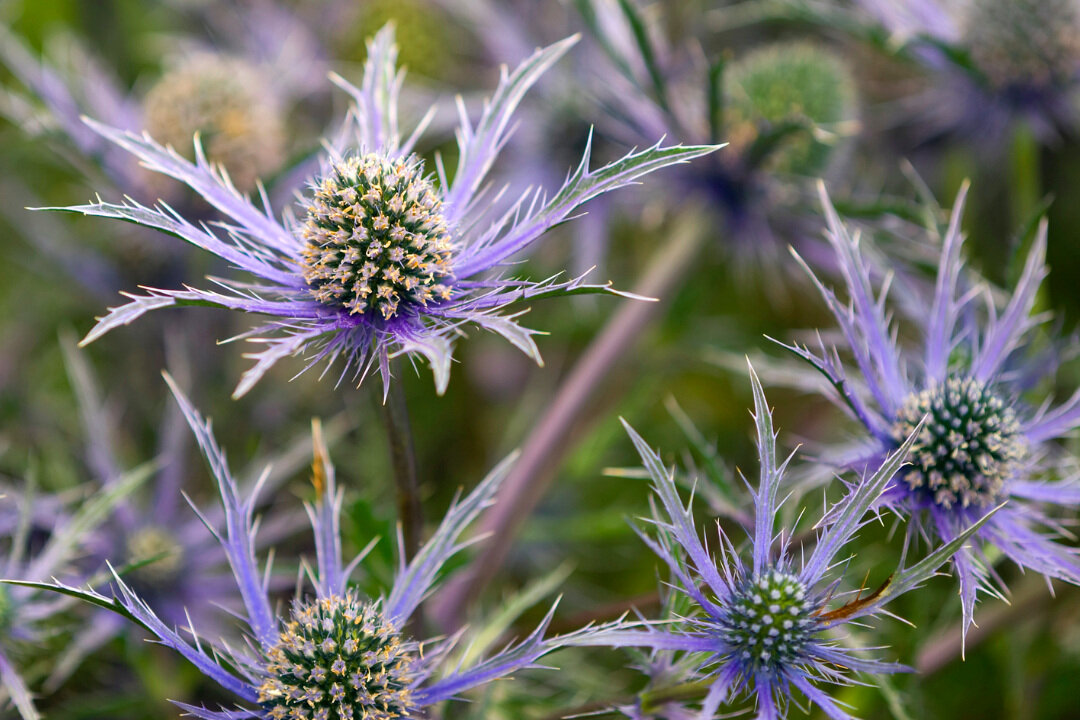
Eryngium - Blue Glitter.
Eryngium - Blue Glitter. This gets a 10+ for cool looks! It has attractive thistle-like blooms with a metallic shine. Eryngium is a hardy perennial with long, sturdy stems.
Does well in hot, sunny locations. But also tolerates a wide variety of conditions. Expect flowers during the second year of growth and in subsequent years (although mine bloomed the first year!). Great for bees, beneficial flies and wasps. Also known as plains eryngo and flat sea holly.
Excellent long lasting cut flower and dries well!

Ben Huston Dahlia in a bouquet.

Dream Catcher Dahlia.
Dahlias - Ben Huston. A juicy orange color on showy decorative petals. Just makes my heart pound every time I see this bloom.
Dahlias - Golden Sceptor. First year growing this dainty and cheerful beauty. True yellow flowers are only 2-3 inches. Such a happy-maker! Your garden will seriously sing with these little beauties.
Dahlias - Dream Catcher. This is a stunning cut flower. Perfect petals that meld pink to yellow to green on strong and upright stems.

Rebecca Lynn Dahlia
Dahlias - Rebecca Lynn. Here’s what I said about Rebecca Lynn last year:
“Rebecca Lynn Dahlia is not just pink, it’s power pink. It’s get-things-done pink. It’s an Elizabeth-Warren-suit-jacket pink. A “nevertheless-she-persists” pink. A woman-with-a-plan pink. Grow this dahlia and you’ll want to do things! Go places! And get er done!”
Looks amazing in the garden and in pots.
There it is friends!
My Best Flowers of 2020.
Now go grow some amazing flowers.
How to Grow Dahlias
Growing dahlias is such a joy!
It takes time, patience and some work. And I know it pays off when blooms start to fill your garden with gorgeous color.
I’m here to walk you through how I grow my dahlias - from starting the tuber to growing-on in the garden.
starting your tubers
Start your tubers inside in mid to late March.
Fill a gallon pot half full of potting mix (I use the organic Pro-Mix from Southside Garden Supply) and lie your tuber in there. Be sure to orient the eye of the tuber toward the top, as that’s where the shoot will come up and turn into your dahlia plant! Unsure what an “eye” looks like? Click Here for a good view of one. You won’t need lights until the shoot pops through. You can keep your pots somewhere out of the way but warmish: 50-70 degrees.
It’ll take about a week or two (sometimes longer) for the shoot to pop through the soil.
Until then, keep your soil dry. Maybe just drizzle water on it if it’s looking super dry or dusty. Too much water will rot your tuber before it sprouts up.
Once the shoot pops through the soil, get your plants under lights!
A simple full spectrum florescent or LED shop light will do. Now you can start watering as needed. Keep soil moist and well drained.
planting out
Wait until after the danger of the last frost has passed before planting your dahlia out in the garden. Historically this means Memorial Day but since our northern climate is changing so fast, I think you can safely plant out around Mother’s Day.
The Merril Field weather station hasn’t recorded a last frost after May 5th for 10 years!
When selecting your planting site, choose a sunny or mostly sunny location. You can opt for a large pot (5 gallons or more) or a place in your garden (raised bed or in-ground).
soil requirements
Be sure to do some soil prep before planting your dahlias to ensure that you get your plants off to a good start. Dig a large hole and mix in some compost and some general fertilizer. I like to use the all purpose fertilizer mix from Down to Earth.
After you’ve planted be sure to schedule a monthly side-dress of a more bloom-specific fertilizer like the bone meal from Down to Earth. To do this, dig a shallow trench next to the plant, add your fertilizer, cover fertilizer with soil and water well.
growing on
Once your dahlias are planted be sure to immediately stake them. You can either use a large tomato cage or a stake (2x2 or long bamboo stick). If using the stake, loosely tie the plant to the stake every now and then to keep the plant supported.
As your dahlia begins to bloom, either cut the blooms for your enjoyment in a vase or dead-head them once they start to fade. This will keep ample energy available for creating new blossoms!
Dahlias will keep blooming until the first frost. Once the dahlia is killed by the frost it is time to save your tubers!
If you have any questions now or as you get growing be sure to comment here or send me an email at turnstonefarm@gmail.com.
Happy growing!!
Choosing Dahlia Varieties
I fell in love with dahlias a little reluctantly.
My first exposure to these wild and beautiful flowers was when I was landscaping for the city. I worked with the Tree and Shrub People but occasionally helped out the Flower People.
The Flower People used to fill a gigantic bed next to the performing arts center with huge (and I thought garish and gaudy) dahlias. I’m sure they were amazing but I always thought them a bit silly. I mean, I was a Tree and Shrub Person after all: practical and no nonsense (I am however often unpractical and full of nonsense).
Once I became a flower farmer I still tried to steer clear of these flowers, mainly because of my previous association with them in the city garden.
But then I saw a different side to these flowers by seeing what other folks were growing for cutting - a more delicate side.
So I cautiously bought a few tubers AND FELL IN LOVE.
I am always amazed that from a sad little tuber grows a huge lush plant that can reach 5-6 feet tall with flowers that come in all colors of the rainbow (almost). The varieties I fell in love with first were the psychadelic looking pompons or ball dahlias. After that first year I quickly started adding new varieties each year.
Now I can honestly say that I’m obsessed with dahlias. I currently have 30 varieties (and over 500 actual tubers) safely tucked in my crawlspace waiting for spring planting.

Ball dahlias: my gate-way drug to the dahlia addiction.
So how do you choose which dahlias to grow?
I, of course, love to grow for cutting.
I always want the option to go into my garden and cut a bloom for the table.
Because of this I’m not going to bother with the short varieties or any other bedding variety flowers for that matter.
If you’re just getting started with dahlias, here’s what I would recommend: buy 3-5 high quality single tubers of different varieties and colors. Or more if you have the space!
Read on to learn about a handful of dahlia types. Within each type there are many different varieties of different colors and slightly different shapes.
1) Anemone varieties like “Pooh” are super fun in the garden but a little short lived in the vase. I love these because they are so different from the traditional looking dahlia. They add true variety to the garden.

Pooh - an anemone variety. This is a super prolific bloomer. And SO CHEERY!!
2) Dinner plate dahlias have huge, luxurious blooms. You can easily fill a vase to overflowing with just a handful of these flowers. I love using these in wedding bouquets and just one in a small vase on the dinner table is ah-mazing.

Cafe au Lait Dahlia - the classic dahlia for luxurious wedding bouquets.
3) Pompon or Ball dahlias can be just a few inches in diameter. I find these the most approachable variety. They are round little balls that look stunningly perfect and rather psychedelic.

Delicate and perfect - the ball dahlia.
4) Cactus dahlias are what I think of as a little garish but they can add texture and interest to the garden. I don’t currently grow these but maybe some day I’ll warm up to their crazy look.

Cactus dahlia
And believe it or not, there are more! I thought as a starter’s-guide the above mentioned varieties would be enough to get you going.
When planning your dahlia garden, pick a color palate (if that’s your thing) or a variety of colors and add diversity and texture by getting a few anemones, a few pompons, a few dinnerplates, etc.
Go here to learn how to grow dahlias in your garden: https://www.turnstonefarmalaska.com/garden-blog/how-to-grow-dahlias
2019 Must Grows! 10 of my favorites from the garden that YOU must try
Each year I try to take copious notes on all my varieties.
At the end of the year I pour over these and decide on what varieties were rock stars and which varieties to cut in the year to come.
There are obvious choices and often tough choices to make as I plan my garden for next year.
Lucky for you, I’ve done all the hard work! Read on to find out what varieties I absolutely LOVED.
Maybe you can try these in your garden next year!

Ferncliff Copper Dahlia after harvest
Ferncliff Copper Dahlia. This was a cheery little ball dahlia on a tall and gorgeous plant. Sort of a red-orange-copper color in a psychedelic ball shape.
The flowers just kept coming all summer! And they are great tuber producers. So before you know it, you’ll have tubers to give away.

Shirley Poppies in full bloom
Shirley Poppies. Folks, this was my first year growing poppies for cut flowers!! I’ve grown the breadseed poppies for seed heads but always felt a bit intimidated about using the flowers as they’re notorious for being short lived in the vase. No more!
These Shirley poppies were out of this world! Easy to grow from seed - I just tossed them in the garden. And prolific - they bloomed through the heat of summer until frost. I even figured out how to keep them happy in the vase for almost a week! (hint - cut just as you start to see color peeking from the bud)

Ruby Silk Grass after harvest
Ruby Silk Grass. Now an annual must-grow.
Last year was a trial year for this and I almost didn’t grow again… I planted it in a shady area with poor soil and it was not happy.
But this year, wow! It was part of my main garden and it did great! If you fancy clumps of golden red grass in your garden (which I highly recommend) you will love this.
I planted about 20 seeds per cell (started these inside) and had gorgeous bunches of colorful grass ALL summer. Plus, it dries great for everlasting bouquets or winter crafts.

Potomac Snapdragons in a variety of colors.
Potomac Snapdragons. It is always hard to decide on which snapdragons to grow each year - there are so many different varieties, colors, sizes, etc. But hands down, my two favorites this year were Potomac Red and Lavender. You can also buy Potomac mix if you prefer a mix of colors.
These guys bloomed ALL summer. They last a long time in the vase without a fuss. And once you cut them from the garden, they just keep sending up new flowers! They even bloomed through the first couple frosts in the fall.

Purple Red Strawflower in a boutonniere
Copper Red & Purple Red Strawflower. These fun flowers always remind me of my first childhood garden!
They’re easy to grow and so fun. Copper Red and Purple Red are vibrant and striking colors that would look great in any garden. And of course the great thing about strawflowers is the everlasting flower you can save and display all year!
Now on to my favorite edibles!
Sungold Tomatoes. Hands down the most prolific cherry tomato I grow.
Golden orange in color and SUPER sweet. If you can only grow one variety of tomato, grow these!
Chocolate Pear Tomatoes. I couldn’t list just one tomato, especially after this hot tomato-happy summer!! This is a fun open pollinated variety of tomato, which means they have not been hybridized so you can save the seeds!!
Sweet, pear shaped and reddish-brown in color. If you can grow two varieties of tomatoes, grow these too!!
Dunja Zucchini. If you like zucchini, you will love these! This is an easy to grow variety that will give you lots of zucchini to get you through the summer.
Red Russian Kale. Hands down this is my favorite kale. It has a smoother leaf structure and the leaf is a bit thicker which makes it a bit “meatier”.
You can grow this into a large plant to harvest big leaves or plant many seeds close together for a salad mix.
Magic Molly Potatoes. I usually let the valley farmers grow my potatoes.
But this year I decided to grow my own for 3 reasons:
1) We have a couple marginal garden beds that are a bit sandy - just perfect for potatoes;
2) Just for my 4-year-old son since nothing is more fun than digging potatoes as a kid;
3) I’m trying each year to grow a little more of my household’s food on our tiny urban lot!
So if you want to grow potatoes too, try these!! These are delicious and a unique deep purple color!
So there you have it! My faves of the 2019 growing season!

Dahlia Saving Part 2
Congratulations: you’ve dug, washed, and dried your dahlia tubers!
Now it’s time to divide and pack them away for next year :)
Some folks don’t divide until spring but I prefer (at least for now) to divide before I pack for storing. This saves space and then I can inventory now so I know how many I’ll have come planting time.
Follow these easy steps to divide and save your tubers!

The first step is to grab your tuber bunch and cut it in half. This will make the whole job more manageable. Sometimes it’s hard to know where to start! Once you make that first cut, it is a little easier to see each tuber individually.
I like to use a sharp knife or a pair of felco snips for cutting. You can try both to see which one works best for you.
Don’t worry if you destroy a few tubers in this process. You will still have plenty to work with.

Once you’ve broken down the tuber bunch it’s time to start dividing individual tubers.
Here’s the most important part: for each intact tuber body you need to have an intact “neck” (the place between the tuber body and the place where the “eye” has formed), and and eye. If you don’t have these components, your tuber will not sprout in the spring
If you’re not sure what a dahlia eye looks like I'm pointing one out here with my pencil. Eyes are either slightly green/yellow (like above) or a purple/red color (like below).

This picture is showing the proper cut to give you the three key components: 1) tuber body, 2) intact neck and 3) eye (you're looking at the cut at the center of the photo. Disregard the broken tuber!).
Once my tubers are cut I dip the cut end in cinnamon (a natural, anti-fungal to ward off mold and rot) and lightly sprinkle in cinnamon.

To store my tubers for the winter I take a paper or plastic bag and put a layer of wood shavings, then a layer of tubers, then a layer of shavings, etc.
Make sure to label your varieties! I leave a plastic label in the bag AND label the paper bag.
All my bags then go in plastic totes with lids and get stored in my crawlspace (which is roughly 40-50 degrees).
Be sure to check your tubers monthly until planting time to make sure they are not drying out too much or rotting!
I hope this helps you save all your gorgeous tubers for next year! Know that for each tuber you plant in the spring you will get 5-15 new tubers for next year. Soon you will be rich in dahlias. They make great gifts or you can trade your neighbors for fun new varieties.
Also, note that you can save the entire tuber bundle intact without dividing. It takes up more space but if you’re only saving a few varieties this might be the way to go. It will save you lots of time!
Please post any questions below. I’m happy to problem-solve with you.

Dahlia Saving Part 1
It’s time to dig and save your dahlias!
Each dahlia plant you have will produce at least 5-10 more tubers underground each year. This means that soon you will be RICH in tubers.
I’m here to walk you through the how-to of dahlia saving. Follow the pictures below for the first few steps in saving your dahlia tubers:
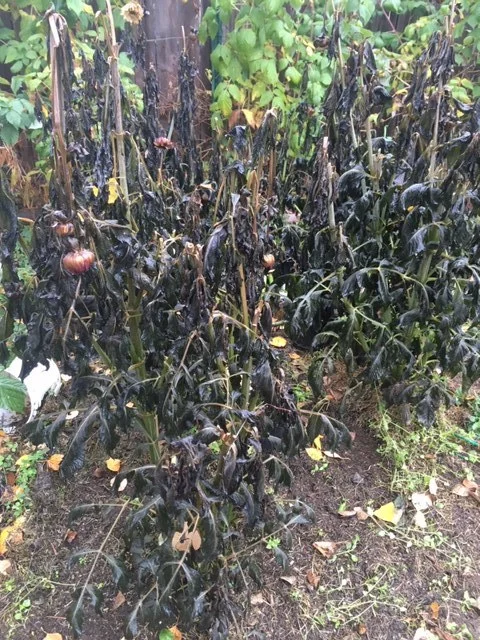
Wait until after the first hard frost to dig your tubers. You’ll know when its time when the plants look completely dead! The stems will still have some green in them but the leaves will look awful. (Quite possibly the ugliest photo I’ll post on my blog!)

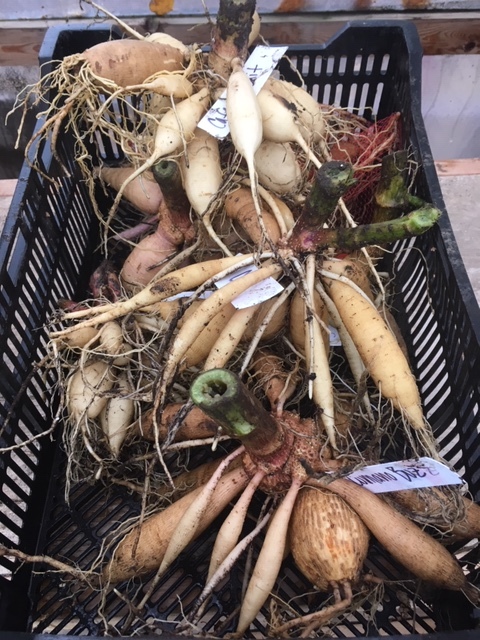
Cut off the stems right above soil level and then gently pry up the tubers with a shovel or a pitchfork. The tubers are rather delicate, so pry gently! Use your hand to carefully dust off the biggest clumps of soil.
At this point, it’s important to make sure all your varieties are properly labeled. They can quickly get all scrambled up once they come out of the soil!

Use a hose to spray the tuber clump clean!
Look how many tubers I got on this baby!!! If they all save beautifully, this one plant will give me about 15-20 tubers for next year :)
Again, make sure you label your tubers so you know what you’re getting next year.
Place them somewhere to dry for 2-3 days. Mine are in my hoophouse and in my shed, gently stacked in bulb crates or hung from the ceiling.
If drying in an outbuilding or outside, don’t let them freeze!
Be sure to also read “Dahlia Saving Part 2” to learn all about dividing, packing and storing your tubers.