

Grasses and Greenery to Elevate your Home Cutting Garden
Once you have a nice collection of flowers planned for your home cutting garden, you are ready to take it to the next level.
It’s time to start growing grasses and greenery.
Here are some of my favorite varieties from this genre of plants.
Amaranth - level of difficulty: moderate.
Amaranth is a grass that has beautiful upright or cascading seed heads.
Hopi Red Dye and Hot Biscuits are my favorites right now although I’ve grown so many different varieties over my 7 years of flower farming.
Plant in week 17 and 19.
Although these grow easily and vigorously I call them moderately challenging because they tend to prefer heat.
Amaranth would grow out of control in my original flower garden in the steamy mid-west heat.
Up in Alaska, they grow slower and are sensitive to cold temps. I’ve lost a few plantings by optimistically planting these out too early.
Pinch when plants are 4 - 6 inches high.
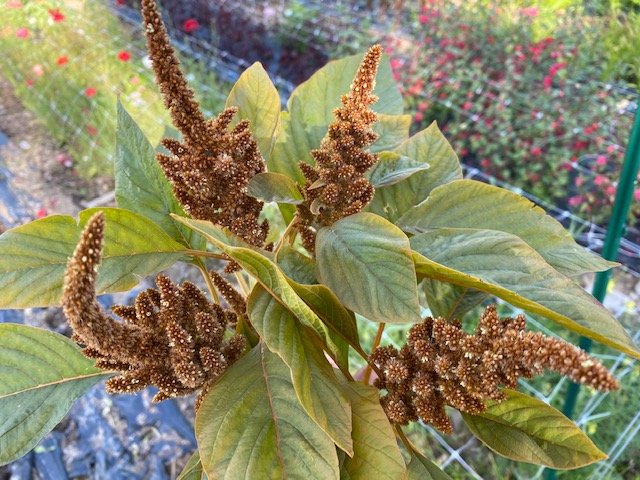
Hot Biscuits Amaranth in the Turnstone Farm Garden.
Atriplex - level of difficulty: easy.
Plant in week 13 and 15.
Pinch when plants are 4-6 inches high OR plant 3-5 seeds to a cell. This will stunt them a bit to make the stems more manageable.
These easily self-seed so be careful - you will have to “weed” these out of places you don’t want them.
Harvest when seed heads have matured completely. Pop in a vase or hang to dry.
Bells of Ireland - level of difficulty: challenging.
Plant indoors in week 15 and 17.
I call these challenging because germination can be spotty and slow, so I often like to pre-sprout in damp paper towels before planting.
Pinch once plants are 4-6 inches tall to promote more stems per plant.
Harvest when the “bells” are firm to the touch.
Bupleurum - level of difficulty: challenging.
Maybe it’s just me, but I find this one challenging to grow. It does prefer to be direct seeded but I like to get a head start indoors.
Plant starting in week 13. You could plan for 2 to 3 successions spaced 2-3 weeks apart if desired.
Be patient as it can take a little longer to germinate.
Harvest when the flower heads are fully open - the flower heads stay green. You can also hang to dry at this stage as well.
Cress - level of difficulty: easy.
Penny, Persian or Wrinkled are what I grow. Seeds save well after being dried.
Plant in week 15 and 18.
Harvest when seed heads are fully mature.
Dill - level of difficulty: easy.
“Bouquet” is the variety best for cutting.
Plant in week 15. You could try a few successions 2 - 3 weeks apart.
I only do one planting since aphid pressure becomes high in my garden later in the summer. I’ve gotten rid of this problem by not replanting dill and certain varieties of kale.
Harvest when seed heads are fully mature.
Add to an arrangement or hang to dry.

Bouquet Dill in a Turnstone Farm wedding arrangement. Photo courtesy of Erica Rose
Fennel - level of difficulty: easy
“Bronze” is lovely but you can try other varieties too. They all offer great ferny and delicate elements to your arrangements.
Start in week 14 and 17.
Harvest at various stages for fun elements. Or wait for seed heads to mature fully to add to bouquets or hang to dry. Smells heavenly.
Figwort - level of difficulty: easy
Plant in 13. This is actually a perennial to zone 4 but will flower the first year. I have yet to discover if it will come back in my garden but there’s no reason to think it won’t.
Harvest when flower heads are fully mature.
Grass - level of difficulty: easy
Highlander, Lowlander, Green Drops and Ruby Silk are 4 of my favorites. But try others! There are many.
Grasses are so fun to grow!
Plant in week 15 and 17.
Remember that one seed equals one grass, so you can cluster 5-7 seeds in one cell or pot when planting.

Ruby Silk Grass from the Turnstone Farm Garden
Scented Geranium - - level of difficulty: moderate
I took a few cuttings from a plant in my son’s school. I now have 7 big and bushy plants sitting in my window waiting to go outside for the summer.
Heres what I did:
1) Take a cutting (feel free to pop by my garden and ask for a cutting in the fall).
2) Place cutting in damp soil or a bit of water. You could add some propagating hormone, but mine sprouted roots without.
3) Once you see roots sprouting, pot them up.
4) Pinch back once plant is 6 inches tall to encourage branching.
5) Harden off and plant out in the garden.
6) Before the first fall frost, dig up, pop in a pot and bring inside. You now have a gorgeous house plant to place in a sunny window all winter.
7) In the spring, harden off and plant out again. You can take cuttings from this plant at any time to make more plants for your garden
Feeling unsure about starting seeds indoors go here to read my blog all it: https://www.turnstonefarmalaska.com/garden-blog/2018/10/27/seed-starting-part-3-starting-your-seeds-indoors
Grow with care and you are well on your way to a killer home cutting garden!

10 Steps to Planning your Dream Garden
Get ready for the best garden ever by following these simple steps.
If you haven’t planned your 2023 garden yet, put it on your schedule!
Get your planning done now so that when planting time comes, it’s smooth sailing through the busy and exciting spring season.
Spring will be here soon.
Here are the 10 steps to planning your dream garden:
Put it in your schedule.
Give yourself ample time to plan. Take care of yourself by giving yourself quiet time to sit, think, and plan. I like to give myself 60-90 minutes of “focus time” for projects like this. After 60-90 minutes I need a break!
Write out all the plants you’d like to grow.
How do you decide? If growing veggies and herbs, grow ones your family already loves to eat. If growing flowers, choose ones that complement where you are expereince-wise. Grow beginner flowers (link to blog) if you’re newer to gardening. Grow harder ones if you want more challenge.
Get real about what you will be growing this season.
Now it’s time to whittle down the above list into a manageable “Core Crop” list. For starters go for 5 veggies, 5 flowers and 2-3 herbs.
Pick your varieties.
Now is the fun time! Once you have your “Core Crop” list, you can dig out those gorgeous seed catalogues and get specific about what you’re growing. Pick varieties that do well in your climate and growing location. Read the descriptions carefully so you get all the information.
Plan your seeding dates.
This is the most challenging part of your planning. I like to create a spreadsheet for this. That way each year I can make adjustments or just do what I did last year.
Need more guidance on this, GET ON MY EMAIL LIST to get notified when The IncrEdible Garden Course opens again - this is my signature online course that teaches you everything you need to know to grow a highly successful backyard oasis filled with food and flowers your family will love.
Plan for succession planting.
In other words, don’t plant all your broccoli seeds at once! Plan to seed accordingly so that you have crops continuously all season.
Draw your gardens.
Use grid paper to draw all your gardens.
Draw in your crops.
I like to make note of all my planned seeding dates (if direct seeding) or all my transplant dates (if seeding indoors) right there on my garden drawing (or map).
Put your first seeding date in your planner or calendar.
Plan for success by having all your tools and supplies ready to go so on your first seeding day, you can get right to work.
Start your garden journal.
This can be a note on your phone (I use Evernote) or a paper journal where you write down everything you notice, see, or experience in your garden. It’s where you write down your failures and your successes. There’s nothing worse than failing at the same thing twice because you forgot to take note of it. This is how you become a better garden!

7 aromatic herbs that also look great in a vase!
I grow lots of herbs. Most are easy to grow and have many multi-purpose benefits for the home gardener and flower farmer.
In this blog, I want to introduce you to 7 herbs I grow every year that not only do culinary wonders but also look great in a vase.
In addition to being a fun addition to the vase, here are some additional benefits of growing herbs:
If you have a tiny garden, growing herbs maximizes your space since you’ll be growing a plant for both culinary and cut flower purposes. I’m all about the multi-purpose plant!
If you don’t have much space to grow, most herbs do great in planters on your porch. In fact, since I like to keep mine close at hand I often grow them in pots just so I can quickly pop out to the porch to pick them.
Once gone to flower, herbs attract and nourish beneficial insects which help keep away the insects you don’t want around.
Fresh herbs are often hard to find and can be expensive at the grocery store. Lucky for you, they are best from the garden anyway!
Picking herbs and keeping a small jar of herbs on your kitchen counter is the best way to keep them once harvested (don’t let them rot in the crisper). My husband and I joke that the crisper is where veggies go to die. This will give you super easy access to them the next time you cook and will bring a nice pop of greenery into your kitchen.
So here are 7 herbs you must add to your home garden.
Chive: Chives, while not easy to start from seed are easy to grow once established. They spread steadily, so every few years you’ll have to dig and replant or give away a clump. The flowers on chives are SO delicious and do great in a vase.
Cilantro: Calypso is a slow to bolt variety great for growing in any northern climate. Use this culinary herb in your favorite dishes. I love a good homemade salsa with lots of cilantro.
Once it has gone to flower, harvest for an aromatic bouquet. The seed heads are also a lovely and fun addition in a bouquet.
Dill: Bouquet variety is specifically for the cutting garden but is also edible so it’s a win-win! This is a super fast grower. You can use the flower or seed head once fully open. The seed heads are also great for drying.
Fennel: Bronze leaf is a beautiful variety. It produces gorgeous flowers and seed heads. Harvest flowers once they are beginning to bloom or use foliage to add texture and a unique color.
Mint: both Common and Mountain varieties are fantastic. Common mint is a rapid spreader so make sure to plant in pots or be prepared to cut it back every year.
Mountain mint is not a spreading variety but in my experience, is very slow to grow and doesn’t always come back year after year. If I plant 10 plants I may get 2-3 to come back again the following year.
Oregano: Greek variety is a best bet. My oregano comes back year after year but even so, I usually start a few plants every spring just in case.
I love letting these go to flower before I cut for the vase. They are long lasting in the vase and fill in an arrangement nicely. Oregano leaves dry well for later use.
Sage: Common sage is a perennial that will flower the second year. Use foliage in culinary dishes, dry for use all winter or use foliage or flowers as greenery in a bouquet.
In my garden, sage will come back for 2 to 3 years and then die out. Because of this, I start a few new plants each spring to keep my garden well stocked.
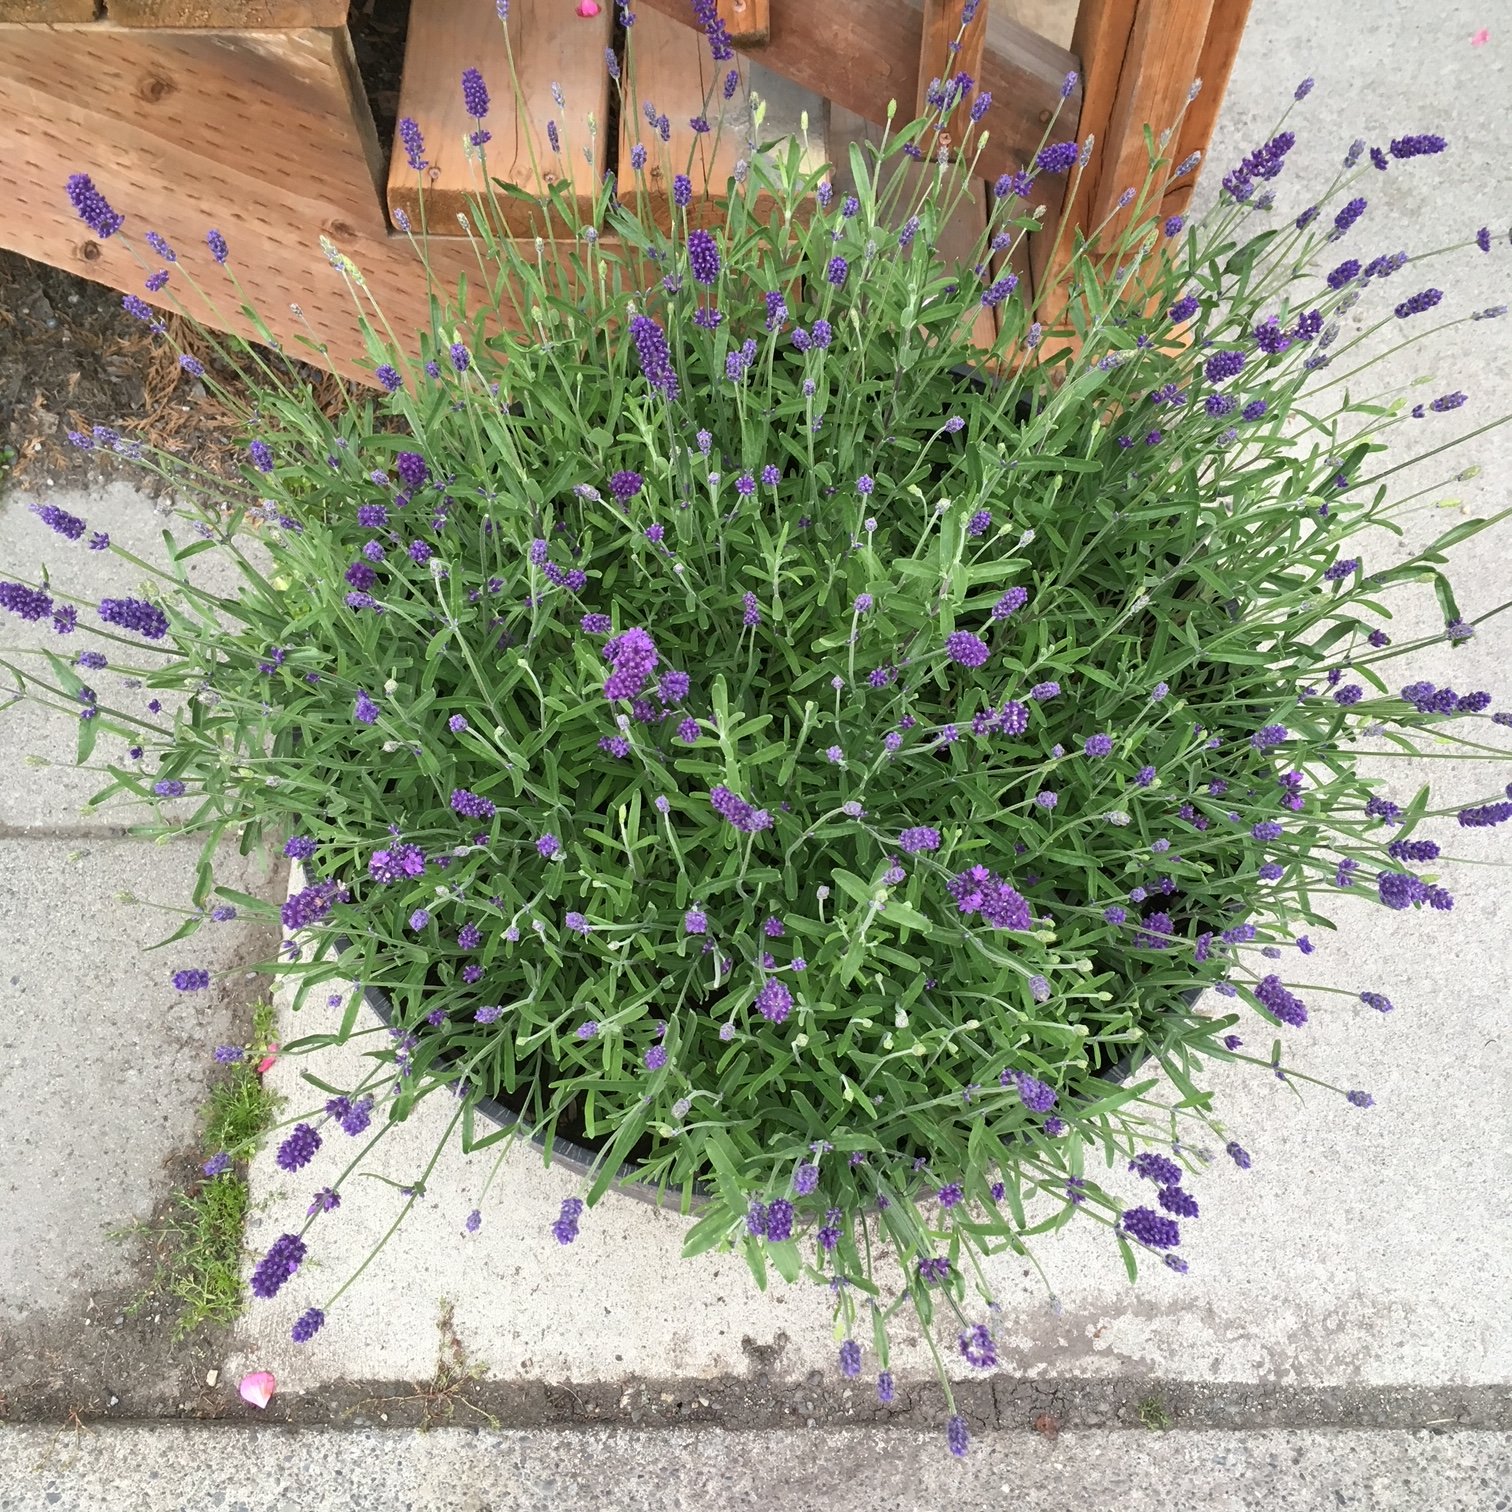
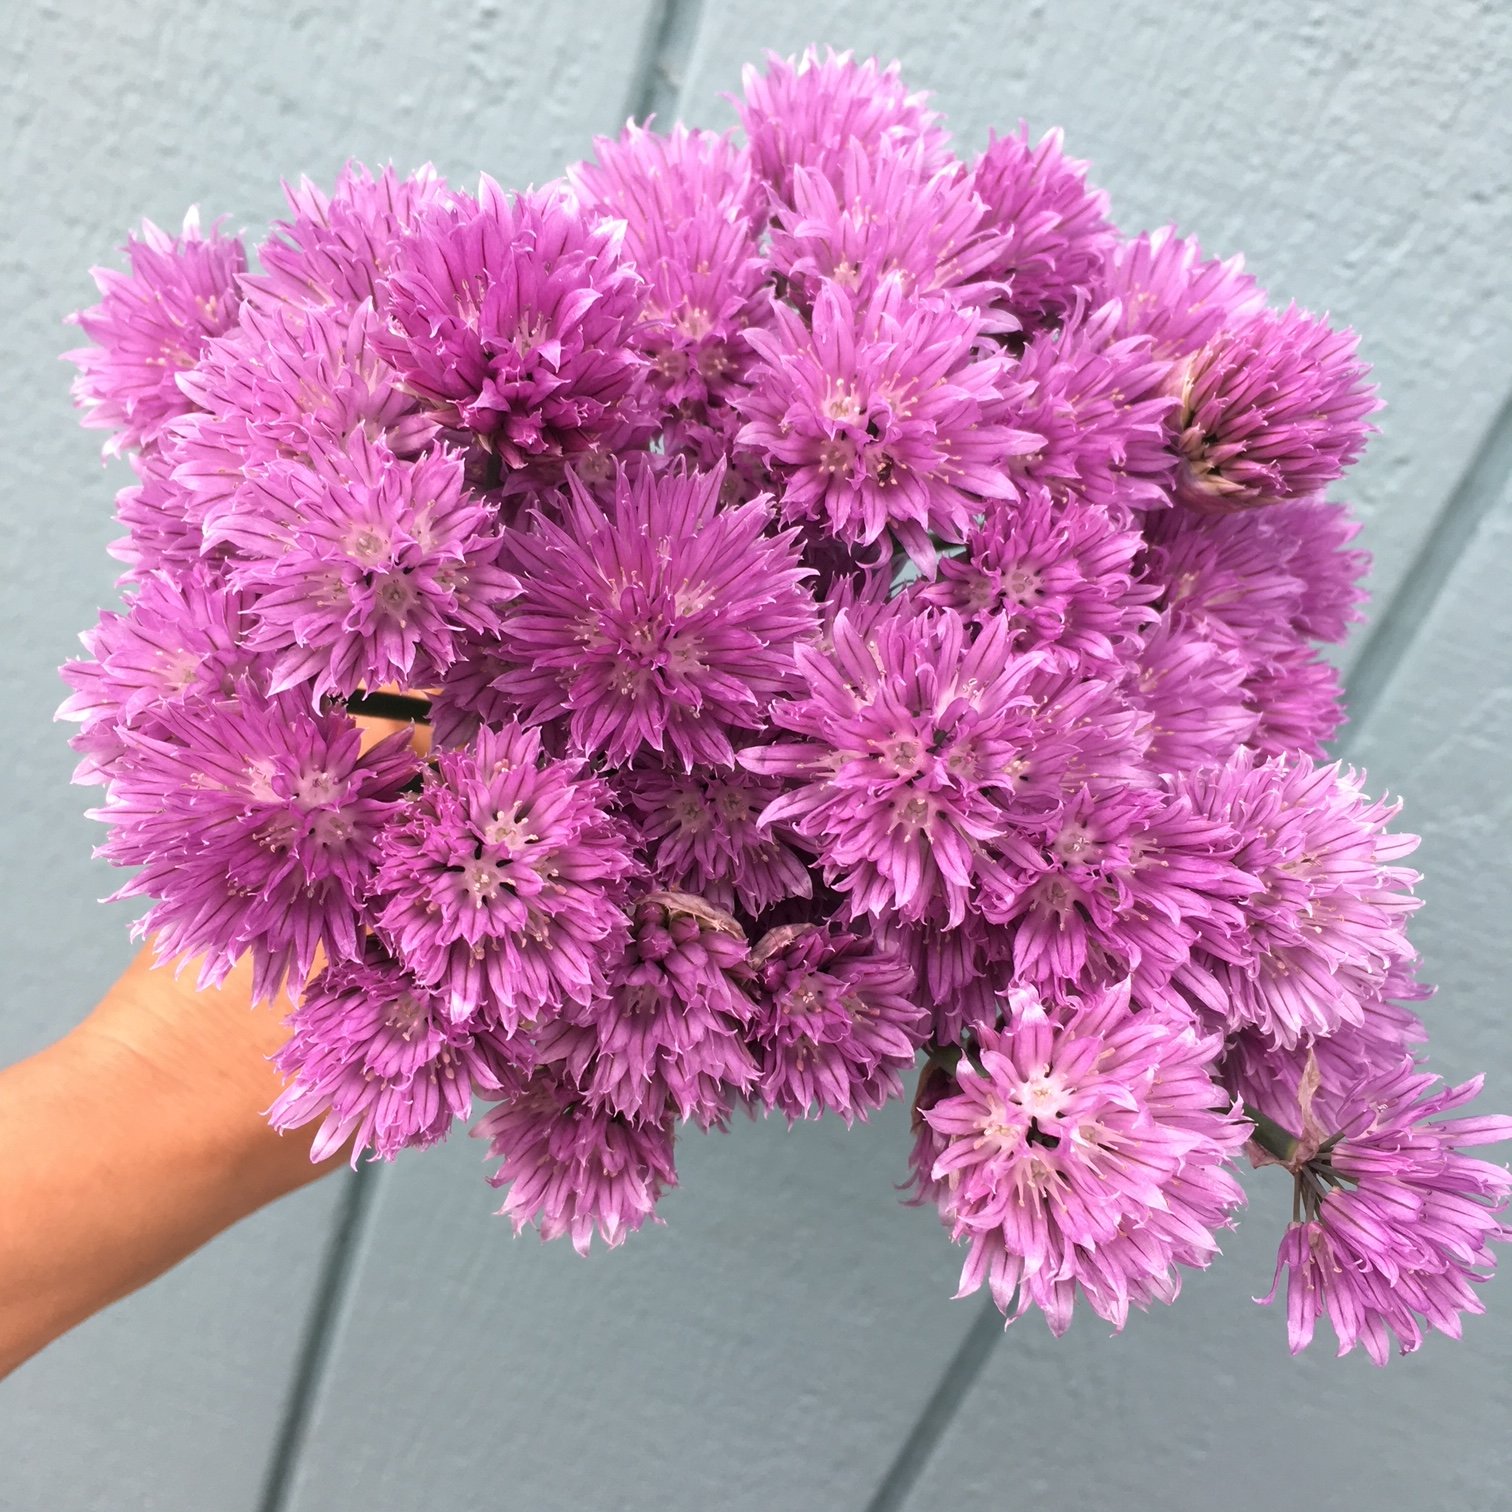
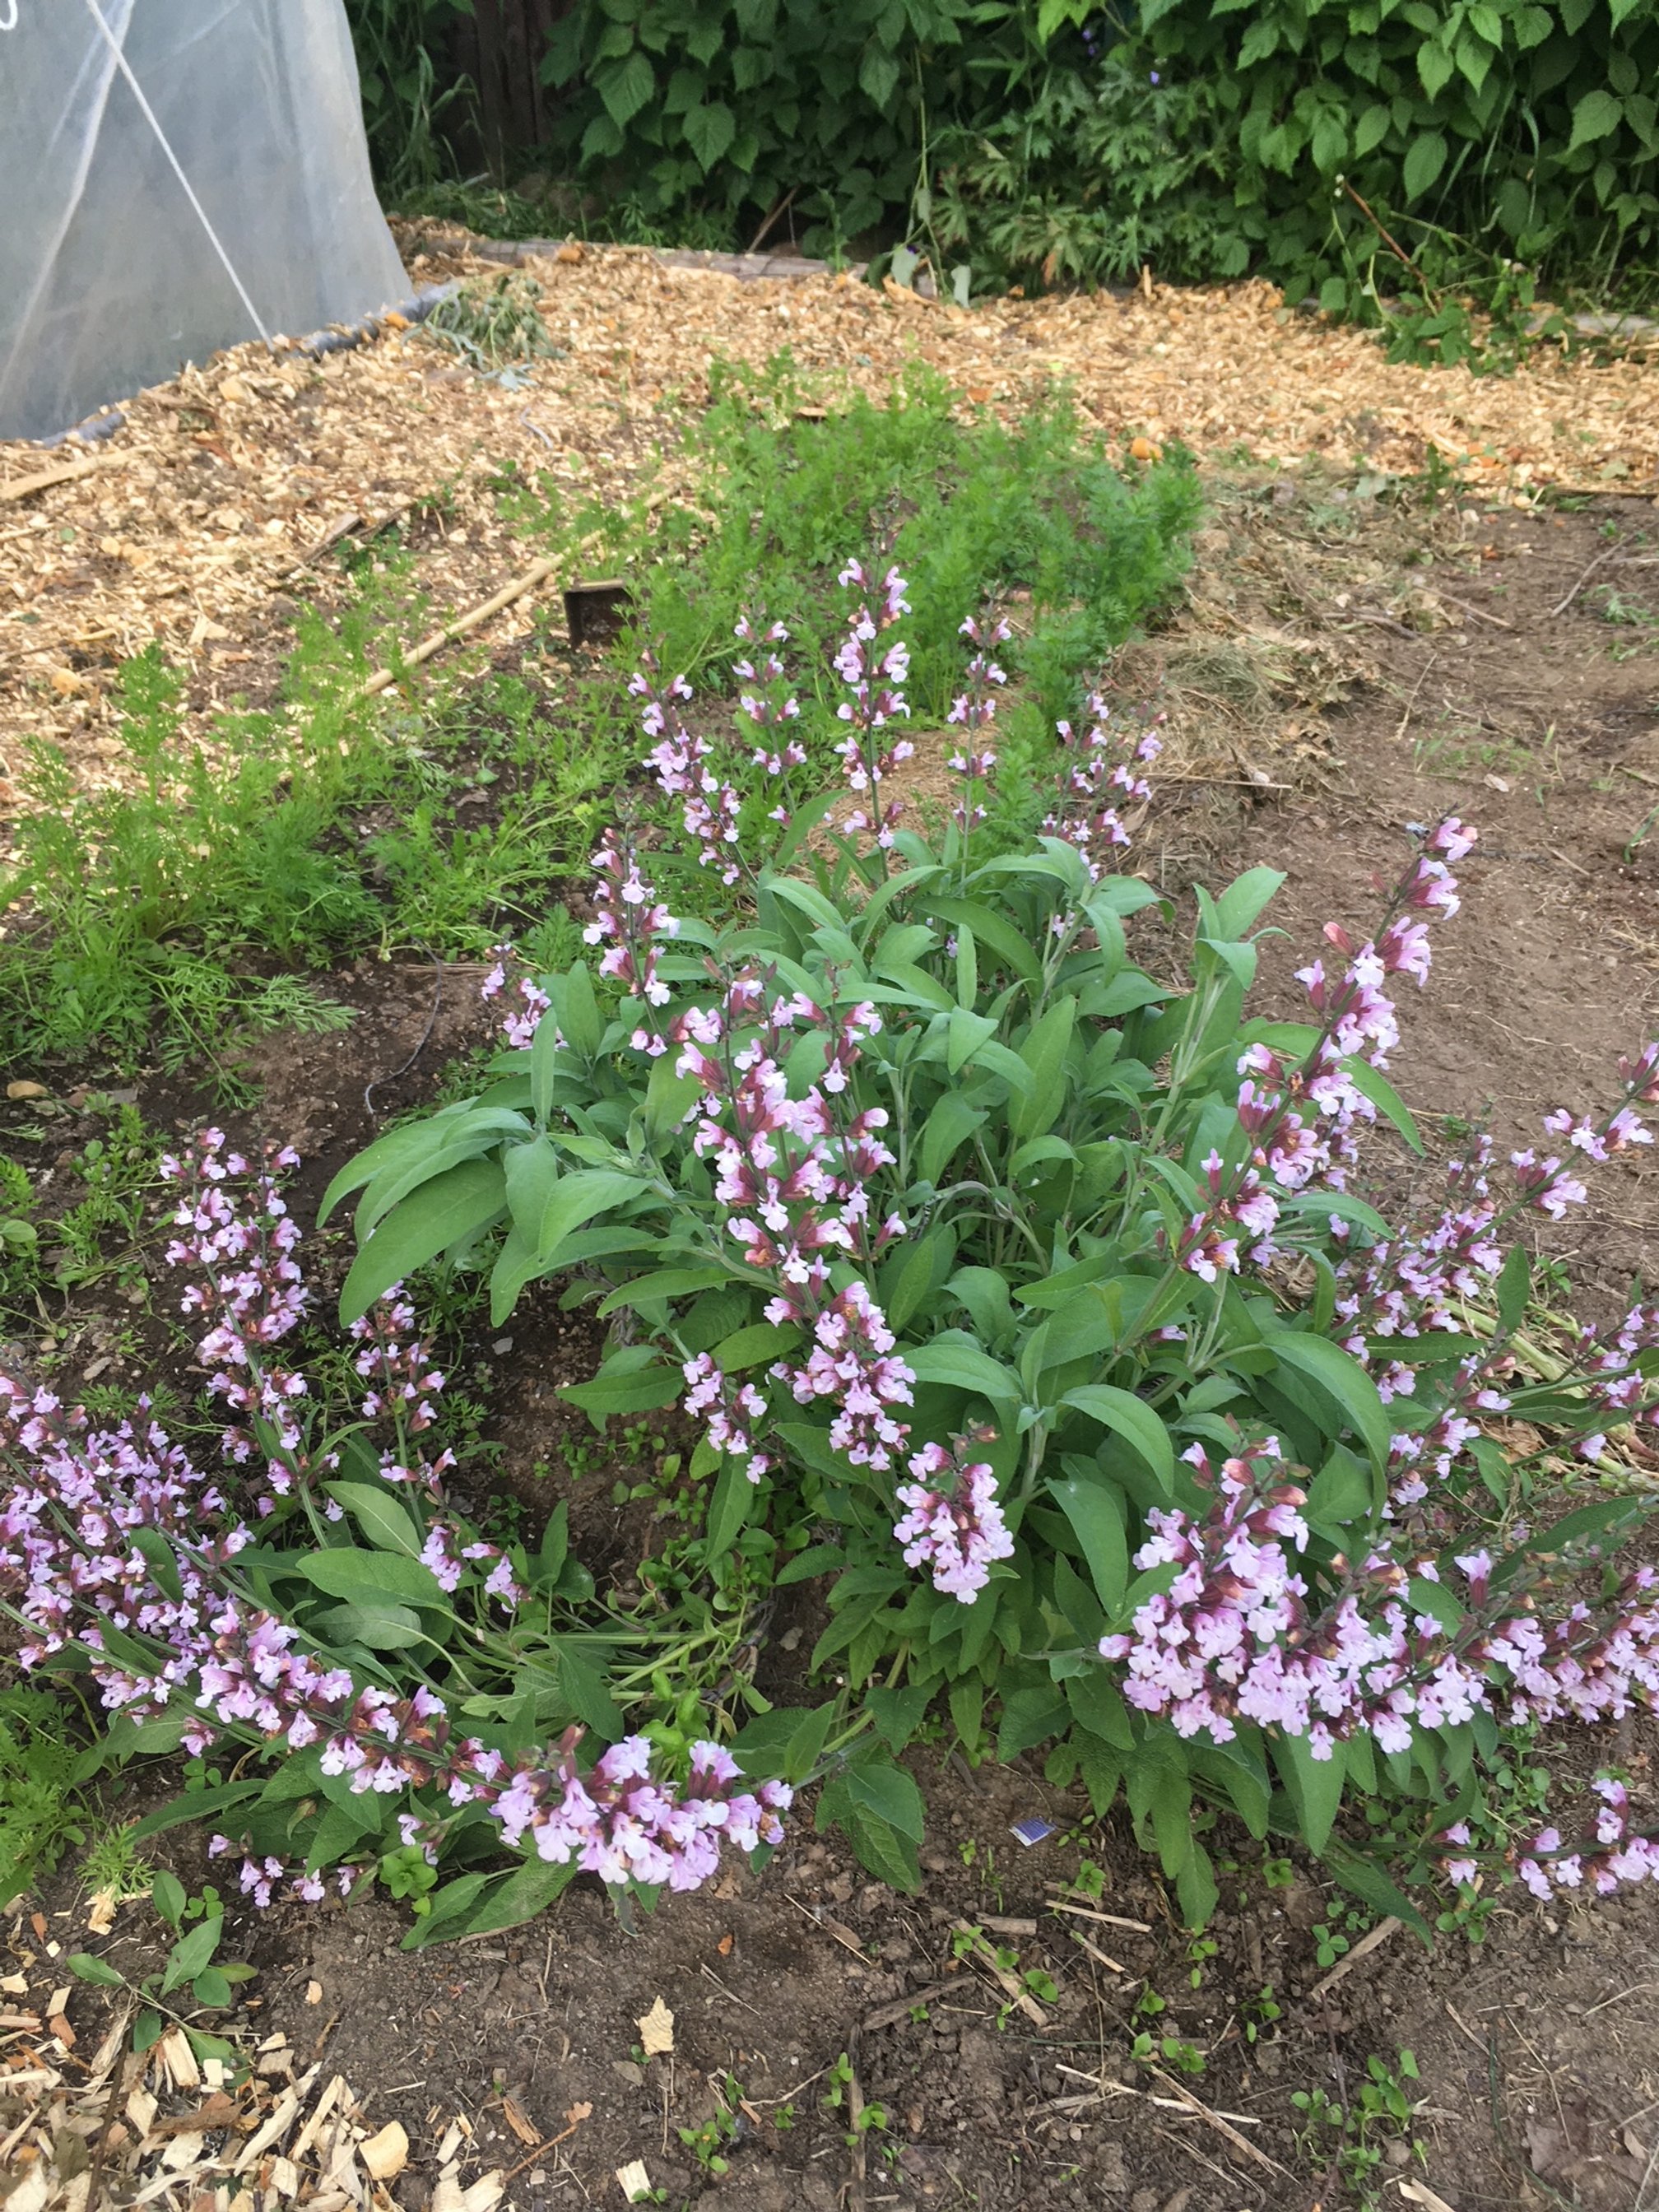
Left to right: Lavender thriving in a planter, Chive flowers - my mouth is watering just looking at these, Sage flowering big time in my home garden.
Plus a bonus herb I encourage you to try!
In addition to these fabulous and relatively easy-to-grow culinary herbs I also want to mention another favorite flower/herb: Lavender. I grow the Elegance variety.
Lavender is more challenging to grow in my northern climate. It is a slow grower and thrives in warmer temps.
This is one of the earliest plants I start by seed. I then make sure to plant it in a warm, sheltered environment which usually means in a pot on my super sunny front porch.
Harvest mature flowers for the vase or harvest each stem when flowers are budding if you want to hang for drying. Lavender keeps its aroma and color well after drying.
If you’re up for a challenge, try this amazing herb. The beauty, aroma, and happiness you will enjoy from this plant are priceless and well worth the difficulty!
Garden Supply Check-list
Spring will be here faster than you think and with that, it’ll be planting time! So let’s get organized.
I want to get you set up early so you’re ready to break ground, or pop those seeds in the soil, as soon as you can.
With supply chain issues going on this year I also want to make sure you buy anything additional that you need soon so you have EVERYTHING you need for a great growing season.
Here’s my challenge to you: over the next 10 days, grab this checklist and head into your garden shed for an early season inventory!
Seeds - inventory what you have - most seeds are viable for 2-3 years
Potting soil for seed starting
Grow lights
Shelving for your plants and lights
Trays and domes - you can use these again and again just be sure to wash before planting
Heat mats & thermostat
Timer for your lights
4 packs or 6 packs - you can use these again and again just be sure to wash before planting
3 inch pots or 4 inch pots - you can use these again and again just be sure to wash before planting
Gallon pots - you can use these again and again just be sure to wash before planting
Plant labels - buy or make your own
Dish gloves or latex gloves - for seed sowing indoors these help keep my hands from getting all dried out
Watering can - I like a kids specific one for watering indoors
Soil test - DIY kit or identify a lab to send out to
Organic soil amendments per your soil test
Compost - home-made or commercial
Trowel
Weeding tools
Pitch fork or broad fork
Bed prep rake or stiff tined rake
Pots and planters and/or garden beds - I know they’re all covered in snow, just make a plan, especially if you need more
Trellising and staking supplies
Garden journal or calendar
Your garden plan and garden map
Garden gloves - I love having a leather pair and a more waterproof pair
Knee pads or equivalent
Did I forget anything? Comment below to share your must-haves for the season.

Tried & True Garden Varieties

Giant Orange Marigolds.
In order to get you growing an amazing and fail-proof garden, I want to get you started with some of my tried and true varieties.
Since I’m a flower LOVER and flower grower this list will be flower heavy. BUT I also want you to have some of my favorite varieties for your veggie garden.
Over the years I’ve rubbed shoulders with vegetable farmers (quite literally - my husband managed a large vegetable CSA at the same time I started my flower farm) and tested different varieties myself.
Often just choosing the right varieties will set you up for success in the garden. And with SO many fun and beautiful varieties out there - how do you know what to choose?
By putting your ear to the ground and being committed to experimenting!
Wiser growers than I have told me to commit 20% of my farm to new varieties. I’m recommending this to you now too.
Don’t go overboard with new stuff - then you risk wasting too much valuable garden space to varieties that you’re not actually sure will produce well. Stick to tried and true varieties and dip your metaphorical toe into fun and exciting new ones each year.
So now on to my tried and true varieties that I know, you’ll love.
First, for the flower garden:
Ammobiom

Ammobium aka Winged Everlasting.
Centaurea - Classic Magic, Blue Boy OR Black Button
Calendula - Orange Button
Cosmos - any Double Click Variety
Cynoglossum - Chinese Forget-me-not OR Firmament
Dill - Bouquet
Ornamental Grass - Frosted Explosion
Marigold - Giant Orange
Nasturtium - Trailing
Nigella - Albion Black Pod
Poppy - Breadseed OR Shirley

Shirley Poppy.
Rudbeckia - Cherokee Sunset
Saponaria - Pink Beauty
Scabiosa - Black Knight
Snapdragon - Potomoc varieties OR Madame Butterfly varieties

Bunches of Potomac Snapdragons.
Strawflowers - Copper Red OR Purple Red
Sunflowers - Procut varieties OR Sunrich varieties
Now for the veggie patch:
Beets - Touchstone Gold & Chiogga
Broccoli - Belstar

Belstar Broccoli just starting to grow crowns.
Carrot - Yaya
Cilantro - Calypso OR Cruiser
Cucumber - Diva OR Socrates
Kale - Red Russian OR Lacinato (also called Dinosaur or Black)

Red Russian Kale co-housed with Dahlias.
Peas - Sugar Ann OR Sugar Snap
Pumpkin - Cinnamon Girl
Spinach - Corvair
Tomato - Sun Gold
Zucchini - Dunja OR Blck Beauty
There you have it! This is by no means a comprehensive list but it’s meant to get you on the right track to a highly productive garden this season.
So now on to ordering seeds! GO HERE to read all about my favorite places to place your order.

Planning Your Dream Garden
I know it’s the middle of winter but believe it or not, it’s time to plan your dream garden!
To be honest, here on the farm this is a HUGE undertaking. Every year it gets a bit easier but I am always surprised by the time this takes.
As a home gardener your task is a little simpler but give yourself time and have fun!
I want to break down your garden planning job into a few smaller tasks. Next to each task I will have a description on how I do this and a link to an actual PDF sample of my planning tools.
1) Make a crop list. List all the crops you are going to grow!
How do you decide? I like to grow things I like to eat! Start there then browse through your seed catalogs and find a few other things you might like to try.
How do you choose varieties? Read about each variety carefully. For Alaska, shorter days to maturity is important especially with very long season crops (like tomatoes). Also try to read between the lines. What are the descriptions NOT saying. For example, I tried a short season cucumber advertised as a great variety for northern growing. Sure win right? Not quite. The flavor and texture was almost unpalatable. Our chickens feasted on those.
I make a simple spreadsheet with the following information on it: crop (i.e. broccoli), variety (Belstar), source (where I bought my seed), days to maturity or DTM (you’ll see this in the description online or on the back of the seed packet), weeks to maturity WTM (just divide your DTM by 7 - I like to do this cause it’s way easier to count back by weeks than for days to figure out when you need to plant), notes (YOU MUST TAKE NOTES THROUGHOUT THE SEASON ON EACH CROP).
CLICK HERE to see a sample of my planing spreadsheet! I have left on a few extra columns here in case you want to add these on yours too.
2) Draw your garden. Sit down and draw your garden!
I like using grid paper for this. Then each grid increment can be a 1 foot or 6 inch increment. OR you can just draw on plain paper and just mark off your actual garden dimensions.
Pencil in where you want each of your chosen crops to grow. Remember to think about taller plants (or plants that need to be trellised) - place these on the north side of your garden so they don’t shade smaller crops. Crops that stay in the ground the whole summer (like broccoli or potatoes) can be further away from your paths than crops you might harvest more often (like salad greens).
This helps you plan where things go and how much you can fit in your area. This also becomes a record (keep your dated drawings) so you can rotate where you grow each crop in subsequent years.
3) Make a planting calendar
CLICK HERE to see a sample of my planting calendar. I plan by week. Week 1 is the first week of the year - using week numbers (and not just dates) is helpful in order to use past planting calendars to plan for future planting dates since actual dates may fall into different weeks each year.
In order to make sure I’m seeding things when I need to I usually start by planning when I want to harvest each crop.
For example, if I need all my broccoli harvested by September 1st, I’ll count back its weeks to maturity (days to maturity/7). If broccoli has 66 days to maturity (or 9.5 weeks to maturity) I will make sure my plants are planted in the ground by the end of June. Note that since broccoli is usually started indoors, I need to add additional time for germination (maybe a week) and indoor growth (a few weeks). So I would start my seeds the first week of June.
Remember you don’t want ALL your beans or broccoli or whatever to be ready at once, so stagger your plantings. Each plant is different but Johnnys and High Mowing, two of my favorite seed saving companies, are usually good at suggesting how far to stagger your plantings in order to get a steady supply of crops all summer.
CLICK HERE to read my previous blog all about ordering seeds.
A note on days to maturity (DTM): DTM is a best guess the seed company can give based on when the plant goes in the ground. Crops usually direct seeded (salad mix, peas, beans, carrots, etc) have a DTM from date sown. Crops usually transplanted (cucumbers, tomatoes, etc.) have a DTM from the time you plant them in the ground. I know this is a bit confusing so remember to use DTM as a guide but not as a written-in-stone rule.
So there you go! Now you’re ready to get started planting.
My 5 Favorite Seed Companies
If you’re a gardener (seasoned or aspiring) I hope you will find my garden resources helpful! Every year I discover new ideas, techniques and sources. I hone and streamline my gardening processes and am here to share what I know.
What I love best of all though is that with gardening you never stop learning. There are endless varieties and variables that can lead to success or failure. And remember, failure is where you really learn! I’m failing all over the place :)

To start, here’s a breakdown of where I order my seeds.
I prefer to order all my seeds online. The variety is endless and it’s easy to source organic and heirloom or open pollinated varieties if that’s what you’re looking for.
1) Johnny’s Selected Seeds. Johnny’s is a comprehensive seed company out of Maine. They carry almost everything you would want to grow AND have tons of growing guides and resources. They carry organic, heirloom, open pollinated and conventional seeds.
I usually order the bulk of my seeds from Johnny’s as the quality and webpage functionality is outstanding.
They offer free shipping for orders over $200.00.
2) High Mowing. This is a company that sells exclusively organic seed out of Vermont. I love this company because I know everything is organic and extremely high quality. Most of my salad greens seeds come from High Mowing.
They offer free shipping on orders over $10.00! This is a screaming deal.
3) Bakers Creek Heirloom Seeds. A company out of the Ozarks that sells heirloom and old fashioned varieties. Their prices are VERY reasonable. Their print catalog is also SUPER fun to look through.
I usually only order some rare and unusual veggies or flowers that I can’t find anywhere else. Even though I don’t order much from them each year, what I have ordered has had great germination and good quality. And their packets of seeds usually have way more seeds than other seed companies.
4) Foundroot. These guys are an Alaskan company out of Haines. They have hand picked varieties that do great in Alaska and cater to home gardeners - which means their packet quantities won’t overwhelm you.
5) Fruition Seeds. Another great seed company based in New York. These guys are a small company with lots of passion and great seed starting resources. All their seeds are organic and open-pollinated.
So there it is! Page through some of these online catalogs or request a print catalog. Curl up in your cozy chair and dream about your spring garden.