

Container Gardening for EVERYONE
I know that for some folks, space is a huge issue when it comes to gardening.
I spent years gardening on my front porch in any vessel that would hold soil. Fortunately, I now own a home with a modest lot and manage an entire vacant lot to grow on - YES, I am blessed.
That being said there are a few reasons I still love growing cut flowers in containers:
1) It increases the amount of space I can cultivate. Even with all my gardening space, I still feel a little greedy in this department - I want more!
2) You can line a porch or patio with them, creating cozy outdoor “rooms”.
3) They are inexpensive to start.
4) They bring your gardens and flowers closer to your home, creating beauty you can view from inside your home (I love positioning all my gardens within view of key windows).
5) If arranged in a sheltered area around your home, you can often plant earlier and harvest later since they are growing in a warmer microclimate (the potted dahlias that I grow on my porch usually get a solid 2 weeks of additional bloom time in the fall.

Grow your dahlias and eat too! Kale planted next to dahlias is both beautiful and utilitarian.
Not sure what to grow in pots?
Here are some of my favorite varieties to pop in a planter:
Calendula
Ammi
Dahlias
mini Sunflowers ( I love growing these en masse in a large container. This is any single stem sunflower, they are simply spaced 4 inches apart in the container. The close proximity will keep them small)
Bachelor buttons
Snapdragons
Cosmos
Borage
Lavender
Nasturtium
Poppies
Sweet Peas
Salad mixes
Greens (kale, collards, etc)
Radishes
Cucumbers
Tomatoes
Pumpkins
Herbs
Space everything a little closer than you would in the garden.
I try to squeeze as many plants into a container as possible. Just remember that overcrowding can lead to less than robust plants. In general, space most plants 6-8 inches apart. If growing dahlias, they need 5 gallons each as a minimum.
So what kinds of planters do you need?
The sky really is the limit, but to get you started here are some ideas. Half whisky barrels, large containers from the garden store. In general anything around 2 gallons and larger. Single herb plants will thrive in a gallon container, but that’s the smallest I ever go.
If using old whisky or wine barrels, ask the garden store if you should line them. Sometimes this is needed if there is alcohol residue in the wood - this will leach into the soil and kill your plants.
Make sure any planters you are using have good drainage. If not, drill small drain holes in the bottom.
Once you’ve got your containers, you’re ready get dirty and fill em up!
Here’s what I fill my containers with: 1/3 garden soil, 1/3 compost, 1/3 potting mix. You can re-use your soil year after year, just treat it like your garden soil and amend it with compost and organic fertilizers every year.
When can you plant?
The great thing about growing in containers is that if you position planters in a warm and sheltered place in your yard (usually close to your house), the soil thaws out quickly each year.
You can often plant earlier than you can in your in-ground beds.
I start my early-season salad mix in April (my last frost date hovers around May 15th). Warmer season crops I still wait until there is no chance of frost.
With this planting schedule, I can easily squeeze two crops into the same container: first my cool-season salad (planted in April and harvested through May), then my warm-season dahlias (planted at the end of May and harvested through September).
Final notes.
The main downside of container growing is the time committed to watering. During a warm summer, when plants are mature, you can plan to water at least once per day, sometimes more.
In addition, any cut flower will grow tall and beautiful. Don’t let a windstorm ruin all your hard work. Stake and support your flowers early. Check them periodically to make sure they’re secure!
Itching to learn more? My online course, The IncrEdible Garden, starts in February 2022!
If you’re not already, YOU MUST GO HERE TO GET ON MY EMAIL LIST FOR FIRST DIBS.
Field Notes: Week 12
Here’s what I seeded this week:
Stock - Iron Rose, Iron Apricot and Iron Yellow (I only grow the Iron varieties nowadays)
Dusty Miller - New Look (I love this stuff but it’s finicky in the vase. We’ll see how much I actually use)
Ammi - Dara
Atriplex - Copper and Red
Frosted Explosion (an amazing ornamental grass)
Statice - Blue, White, Apricot, Rosyred (new color!!)
Artemesia - Sweet Annie
Tomatoes - Sungold (my absolute favorite), Edox, Sakura, White Cherry, Chocolate Pear
Dahlias - planted the remainder of my dahlia tubers to equal 150 plants. Have some tubers left over. But my house is full.
Just about ready to transplant plants from a couple of weeks ago!
Came home from a weekend in Talkeetna to find an entire tray of seedlings all dried out!! NOOOO! Luckily they perked right up.

Half my dahlias are up and under the lights!
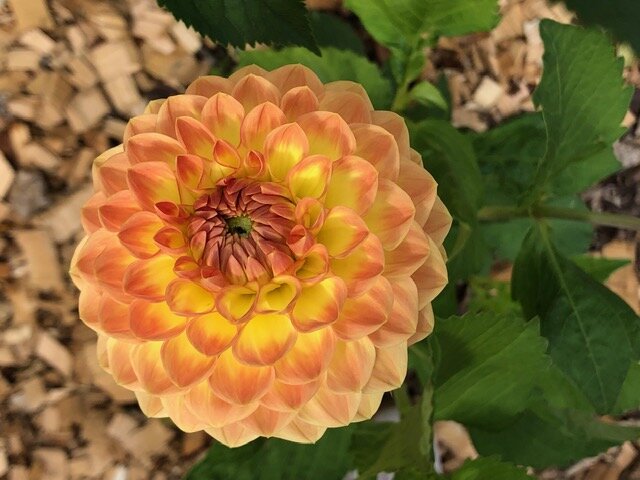
How to Grow Dahlias
Growing dahlias is such a joy!
It takes time, patience and some work. And I know it pays off when blooms start to fill your garden with gorgeous color.
I’m here to walk you through how I grow my dahlias - from starting the tuber to growing-on in the garden.
starting your tubers
Start your tubers inside in mid to late March.
Fill a gallon pot half full of potting mix (I use the organic Pro-Mix from Southside Garden Supply) and lie your tuber in there. Be sure to orient the eye of the tuber toward the top, as that’s where the shoot will come up and turn into your dahlia plant! Unsure what an “eye” looks like? Click Here for a good view of one. You won’t need lights until the shoot pops through. You can keep your pots somewhere out of the way but warmish: 50-70 degrees.
It’ll take about a week or two (sometimes longer) for the shoot to pop through the soil.
Until then, keep your soil dry. Maybe just drizzle water on it if it’s looking super dry or dusty. Too much water will rot your tuber before it sprouts up.
Once the shoot pops through the soil, get your plants under lights!
A simple full spectrum florescent or LED shop light will do. Now you can start watering as needed. Keep soil moist and well drained.
planting out
Wait until after the danger of the last frost has passed before planting your dahlia out in the garden. Historically this means Memorial Day but since our northern climate is changing so fast, I think you can safely plant out around Mother’s Day.
The Merril Field weather station hasn’t recorded a last frost after May 5th for 10 years!
When selecting your planting site, choose a sunny or mostly sunny location. You can opt for a large pot (5 gallons or more) or a place in your garden (raised bed or in-ground).
soil requirements
Be sure to do some soil prep before planting your dahlias to ensure that you get your plants off to a good start. Dig a large hole and mix in some compost and some general fertilizer. I like to use the all purpose fertilizer mix from Down to Earth.
After you’ve planted be sure to schedule a monthly side-dress of a more bloom-specific fertilizer like the bone meal from Down to Earth. To do this, dig a shallow trench next to the plant, add your fertilizer, cover fertilizer with soil and water well.
growing on
Once your dahlias are planted be sure to immediately stake them. You can either use a large tomato cage or a stake (2x2 or long bamboo stick). If using the stake, loosely tie the plant to the stake every now and then to keep the plant supported.
As your dahlia begins to bloom, either cut the blooms for your enjoyment in a vase or dead-head them once they start to fade. This will keep ample energy available for creating new blossoms!
Dahlias will keep blooming until the first frost. Once the dahlia is killed by the frost it is time to save your tubers!
If you have any questions now or as you get growing be sure to comment here or send me an email at turnstonefarm@gmail.com.
Happy growing!!