

Grow Your Own Cutting Garden: 5 Cut Flowers for the Beginning Gardener
Learn these 5 easy-to-grow for the beginning cut flower grower.
If you’re new to growing flowers for cutting I want to offer you 5 flowers that are fantastic for the beginning grower.
Master these and then you can move on to more difficult ones next year.
#1 Calendula is an easy and prolific flower.
Varieties I love are Orange Button and Ivory Princess. Orange Button is the classic bright orange calendula flower. Ivory Princess is a unique soft yellow.
Strip the petals off for a salad garnish or to dry and then add to salves or use as a natural dye.
You can start these directly in the garden or inside. I’m seeding mine in week 14 and week 17 in order to have 6 weeks of continuous blooms. I also leave the calendula patch clear in the garden because they readily self seed. You could plant these once and then simply let a few plants go to seed each fall. You will then not have to re-seed ever again!
Fun fact: some people feed calendula to their chickens to create a more orange yolk. I’m not sure it changes the nutritional value of the eggs but it does make the yolk beautiful.

Ivory Princess Calendula in the Turnstone Farm garden
#2 Bachelor Buttons are one of the earliest blooming flowers in the annual garden.
Blue Boy, Classic Magic and Black Button are fantastic varieties. I plant these once in week 14. You could definitely plan for at least two plantings for continuous blooms all season. I opt not to since cutting these small flowers is very time consuming on a large scale. They are valuable to me in the early season though, since they are one of the first to bloom in my garden.
Fun fact: Bachelor Button flowers are edible. They make for a great garnish.

Bachelor Buttons in the Turnstone Farm Garden
#3 Marigolds are one of my absolute favorite flowers.
Every year I grow Giant Orange. It is the best for cutting and produces loads of big, fragrant blooms.
I’m planting two successions: one in week 14 and one in week 16.
Make sure to pinch marigolds back when they are 4-6 inches tall. If you don’t pinch, you will only get 1 flower per plant. If you pinch, you will get many, many blooms.
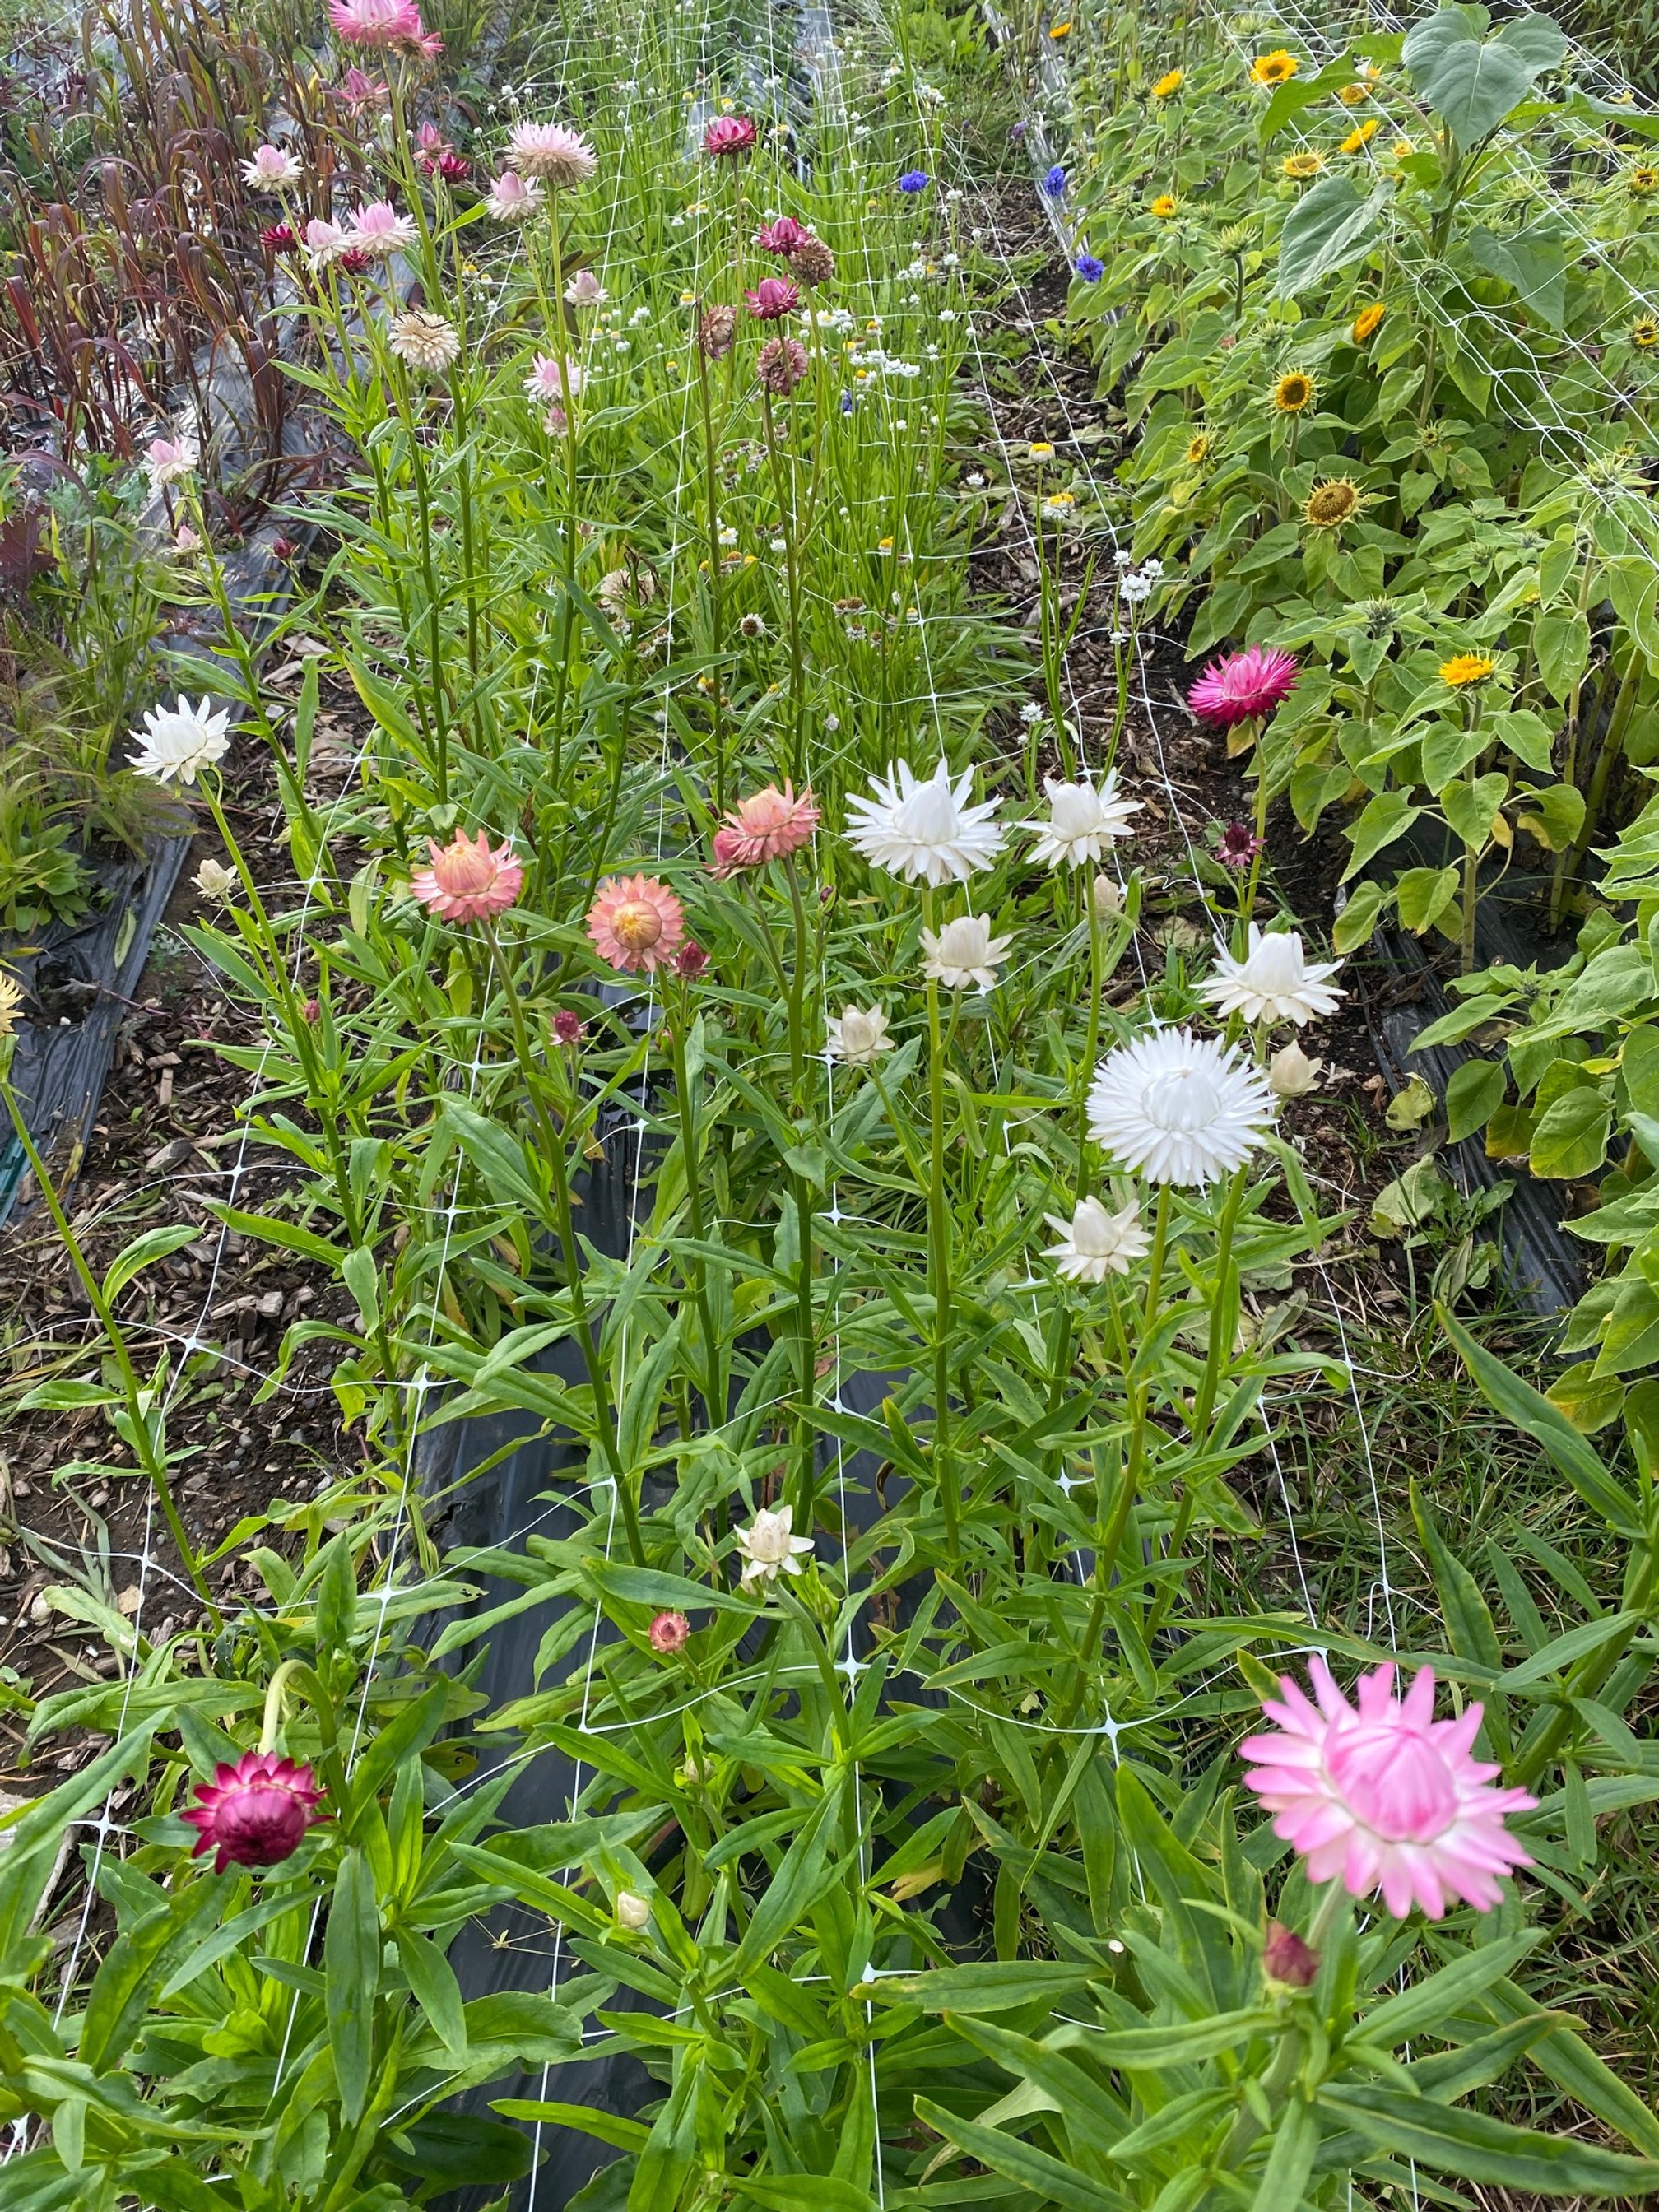
Most cut flowers, including marigolds benefit from being supported by netting (shown below). This helps support them in a heavy rain or wind storm. It’s easy to lose an entire crop in one storm if you fail to do so.
Fun fact: Marigolds dry great hung upside down. They hold their vibrant color well and make for fantastic fall dried arrangements.

Giant Orange Marigolds

Be sure to net your flowers so you don’t lose them in a storm.
#4 Poppies are one of the most cheerful additions to the garden.
My favorite varieties include any Breadseed variety (they are the best for pod production) and any Shirley variety. They both come in many colors! Pick a few to start with and have fun.
Don’t forget to save your own seed as it is very easy to do so. I usually just let poppies self seed in the garden from the pods of the previous year. If I’m starting a new variety, I’ll start these indoors in week 20 and week 22.
The only way you’ll ever get poppies in an arrangement is if you grow your own or buy from a local farmer. Since they have a short vase life, they do not transport well. Even with the short vase life they are so worth the effort.
Harvest for the vase right when the bud is about to pop open and you can just start to see the color of the bloom.
Fun fact: poppy pods are fabulous dried and made into fall arrangements or popped into a bud vase.

Shirley poppy in the Turnstone Farm garden.
#5 Strawflowers are an easy and whimsical addition to your garden.
Copper Red, Purple Red and Apricot are my favorites. Although there are so many kinds, so you can’t go wrong.
Strawflowers benefit from pinching. If you don’t, you will get one flower on one very thick stem.
I’m seeding my strawflowers in week 14 and week 17.
Fun fact: harvest at different stages of bloom to get different looking elements in your arrangements: bud stage, just about to open, and fully open.

A dried Turnstone Farm arrangement with strawflowers.

10 Steps to Planning your Dream Garden
Get ready for the best garden ever by following these simple steps.
If you haven’t planned your 2023 garden yet, put it on your schedule!
Get your planning done now so that when planting time comes, it’s smooth sailing through the busy and exciting spring season.
Spring will be here soon.
Here are the 10 steps to planning your dream garden:
Put it in your schedule.
Give yourself ample time to plan. Take care of yourself by giving yourself quiet time to sit, think, and plan. I like to give myself 60-90 minutes of “focus time” for projects like this. After 60-90 minutes I need a break!
Write out all the plants you’d like to grow.
How do you decide? If growing veggies and herbs, grow ones your family already loves to eat. If growing flowers, choose ones that complement where you are expereince-wise. Grow beginner flowers (link to blog) if you’re newer to gardening. Grow harder ones if you want more challenge.
Get real about what you will be growing this season.
Now it’s time to whittle down the above list into a manageable “Core Crop” list. For starters go for 5 veggies, 5 flowers and 2-3 herbs.
Pick your varieties.
Now is the fun time! Once you have your “Core Crop” list, you can dig out those gorgeous seed catalogues and get specific about what you’re growing. Pick varieties that do well in your climate and growing location. Read the descriptions carefully so you get all the information.
Plan your seeding dates.
This is the most challenging part of your planning. I like to create a spreadsheet for this. That way each year I can make adjustments or just do what I did last year.
Need more guidance on this, GET ON MY EMAIL LIST to get notified when The IncrEdible Garden Course opens again - this is my signature online course that teaches you everything you need to know to grow a highly successful backyard oasis filled with food and flowers your family will love.
Plan for succession planting.
In other words, don’t plant all your broccoli seeds at once! Plan to seed accordingly so that you have crops continuously all season.
Draw your gardens.
Use grid paper to draw all your gardens.
Draw in your crops.
I like to make note of all my planned seeding dates (if direct seeding) or all my transplant dates (if seeding indoors) right there on my garden drawing (or map).
Put your first seeding date in your planner or calendar.
Plan for success by having all your tools and supplies ready to go so on your first seeding day, you can get right to work.
Start your garden journal.
This can be a note on your phone (I use Evernote) or a paper journal where you write down everything you notice, see, or experience in your garden. It’s where you write down your failures and your successes. There’s nothing worse than failing at the same thing twice because you forgot to take note of it. This is how you become a better garden!

7 aromatic herbs that also look great in a vase!
I grow lots of herbs. Most are easy to grow and have many multi-purpose benefits for the home gardener and flower farmer.
In this blog, I want to introduce you to 7 herbs I grow every year that not only do culinary wonders but also look great in a vase.
In addition to being a fun addition to the vase, here are some additional benefits of growing herbs:
If you have a tiny garden, growing herbs maximizes your space since you’ll be growing a plant for both culinary and cut flower purposes. I’m all about the multi-purpose plant!
If you don’t have much space to grow, most herbs do great in planters on your porch. In fact, since I like to keep mine close at hand I often grow them in pots just so I can quickly pop out to the porch to pick them.
Once gone to flower, herbs attract and nourish beneficial insects which help keep away the insects you don’t want around.
Fresh herbs are often hard to find and can be expensive at the grocery store. Lucky for you, they are best from the garden anyway!
Picking herbs and keeping a small jar of herbs on your kitchen counter is the best way to keep them once harvested (don’t let them rot in the crisper). My husband and I joke that the crisper is where veggies go to die. This will give you super easy access to them the next time you cook and will bring a nice pop of greenery into your kitchen.
So here are 7 herbs you must add to your home garden.
Chive: Chives, while not easy to start from seed are easy to grow once established. They spread steadily, so every few years you’ll have to dig and replant or give away a clump. The flowers on chives are SO delicious and do great in a vase.
Cilantro: Calypso is a slow to bolt variety great for growing in any northern climate. Use this culinary herb in your favorite dishes. I love a good homemade salsa with lots of cilantro.
Once it has gone to flower, harvest for an aromatic bouquet. The seed heads are also a lovely and fun addition in a bouquet.
Dill: Bouquet variety is specifically for the cutting garden but is also edible so it’s a win-win! This is a super fast grower. You can use the flower or seed head once fully open. The seed heads are also great for drying.
Fennel: Bronze leaf is a beautiful variety. It produces gorgeous flowers and seed heads. Harvest flowers once they are beginning to bloom or use foliage to add texture and a unique color.
Mint: both Common and Mountain varieties are fantastic. Common mint is a rapid spreader so make sure to plant in pots or be prepared to cut it back every year.
Mountain mint is not a spreading variety but in my experience, is very slow to grow and doesn’t always come back year after year. If I plant 10 plants I may get 2-3 to come back again the following year.
Oregano: Greek variety is a best bet. My oregano comes back year after year but even so, I usually start a few plants every spring just in case.
I love letting these go to flower before I cut for the vase. They are long lasting in the vase and fill in an arrangement nicely. Oregano leaves dry well for later use.
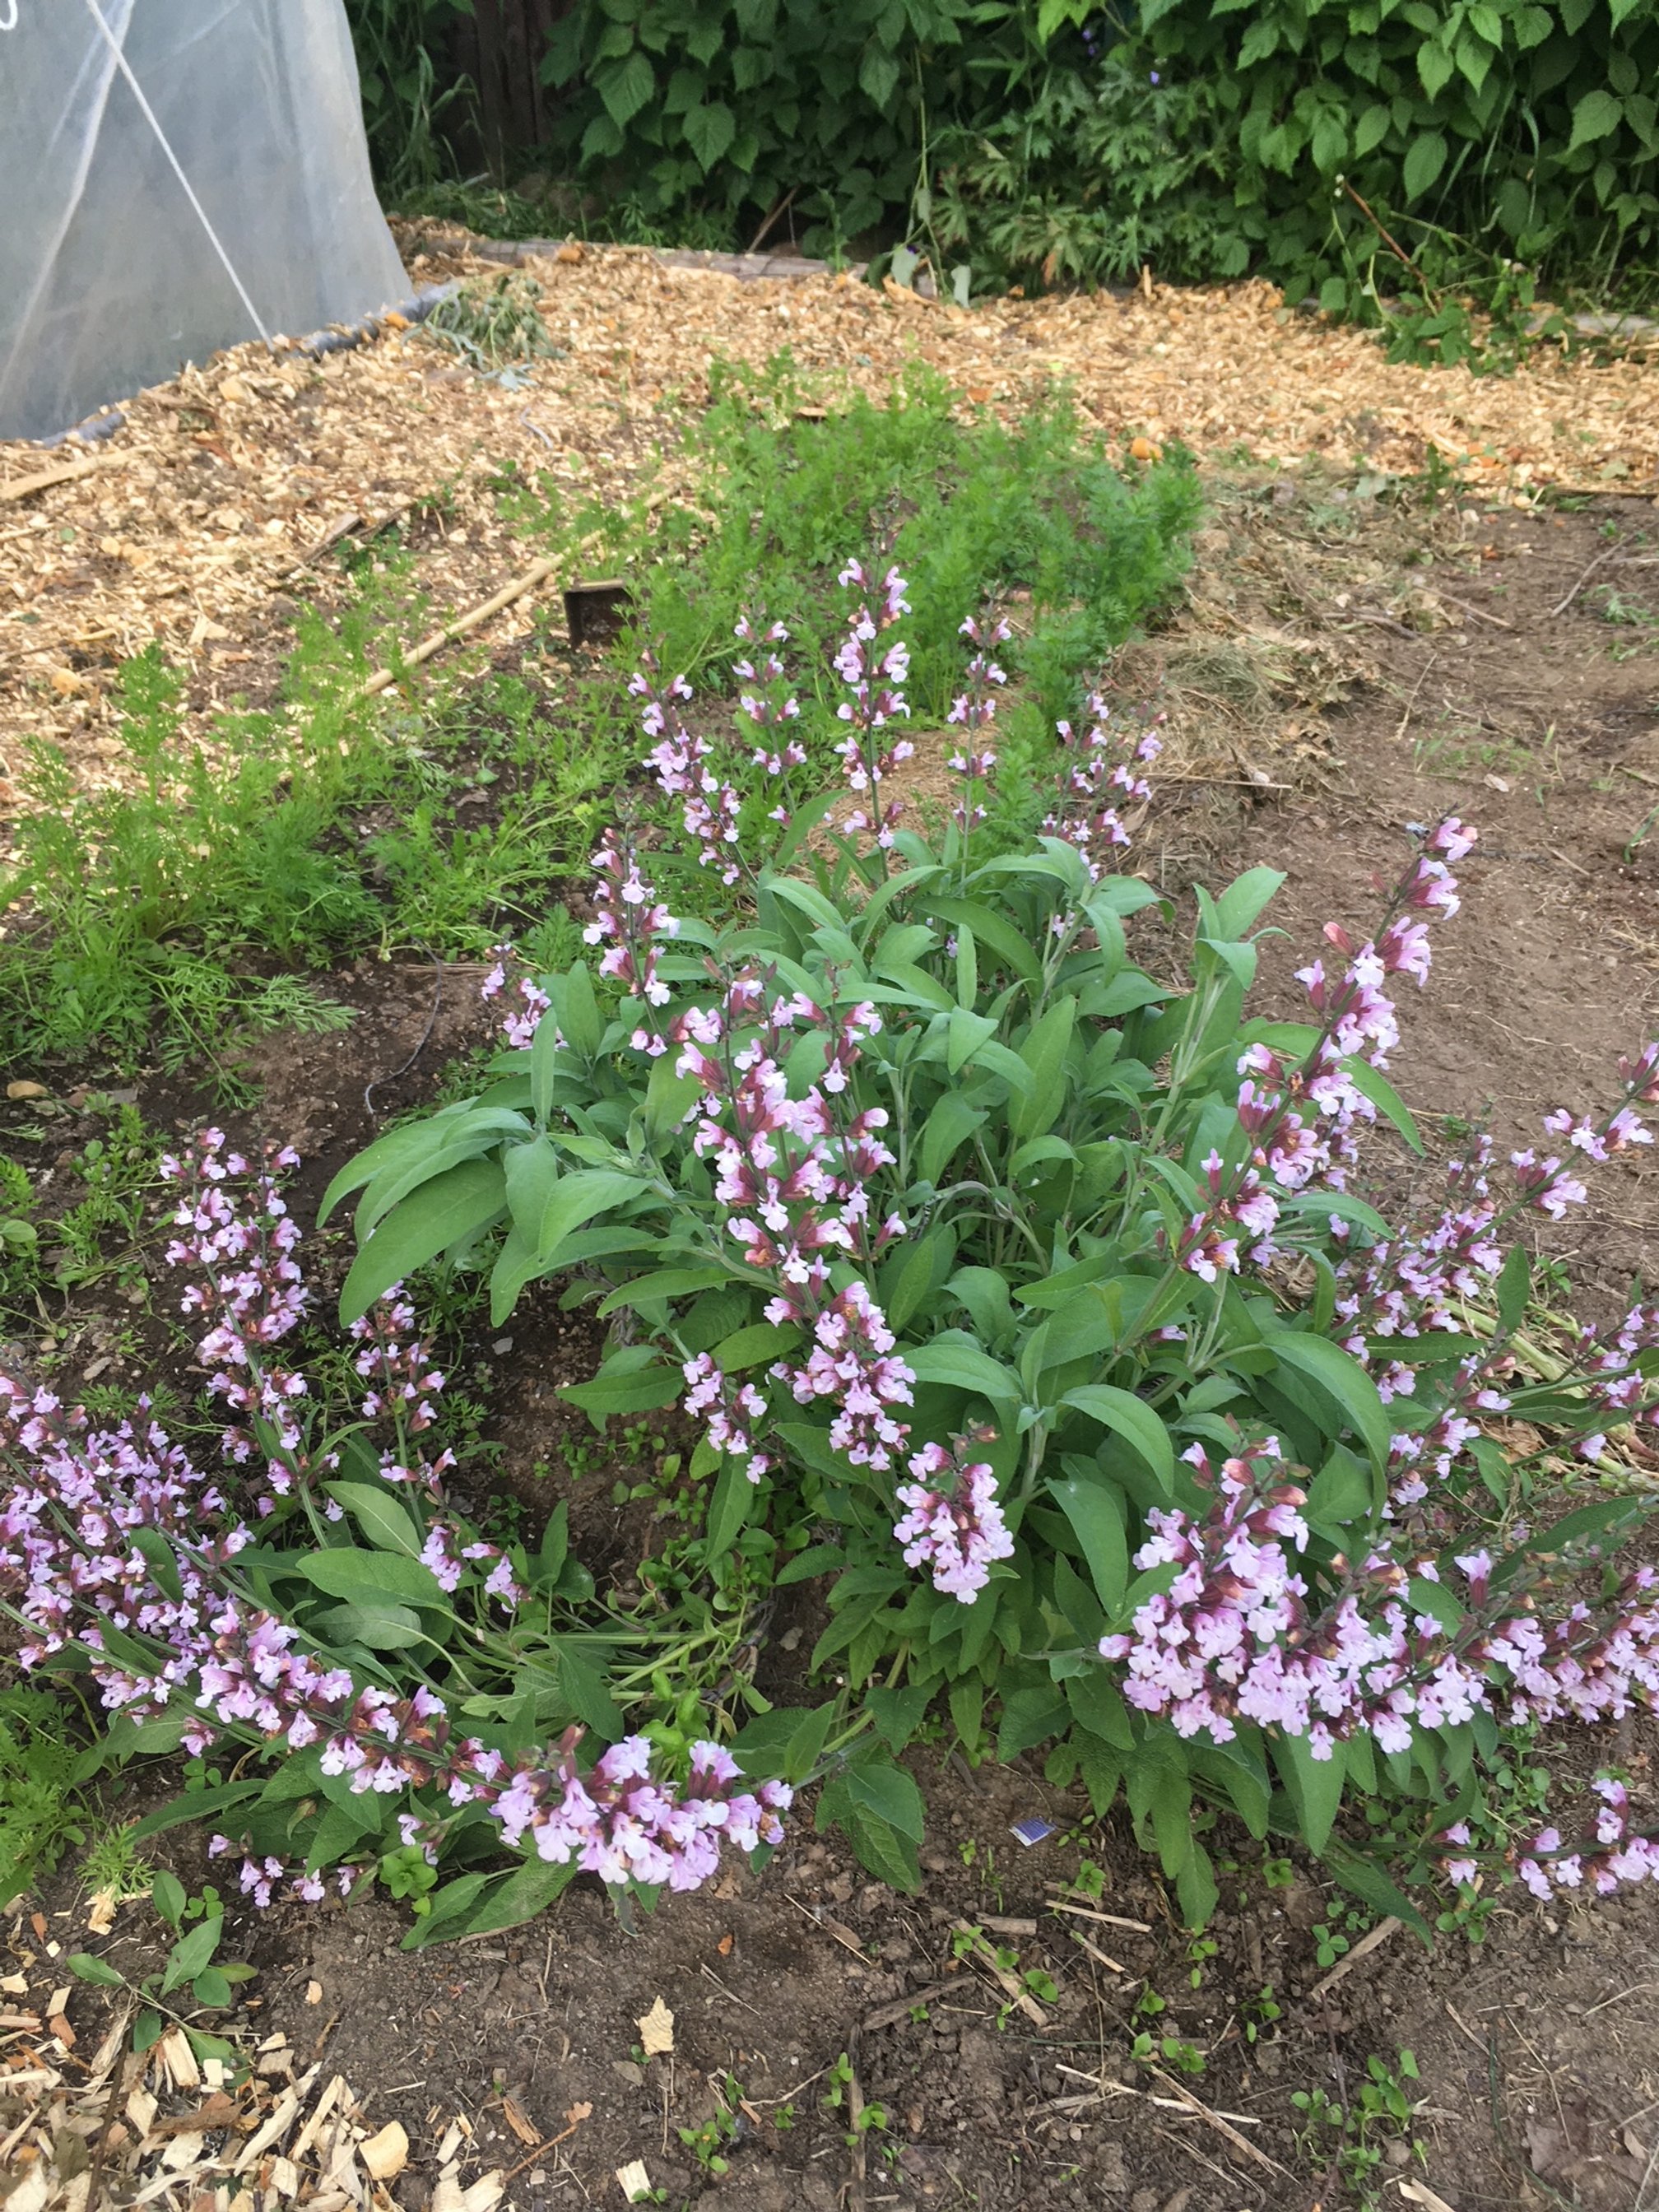
Sage: Common sage is a perennial that will flower the second year. Use foliage in culinary dishes, dry for use all winter or use foliage or flowers as greenery in a bouquet.
In my garden, sage will come back for 2 to 3 years and then die out. Because of this, I start a few new plants each spring to keep my garden well stocked.
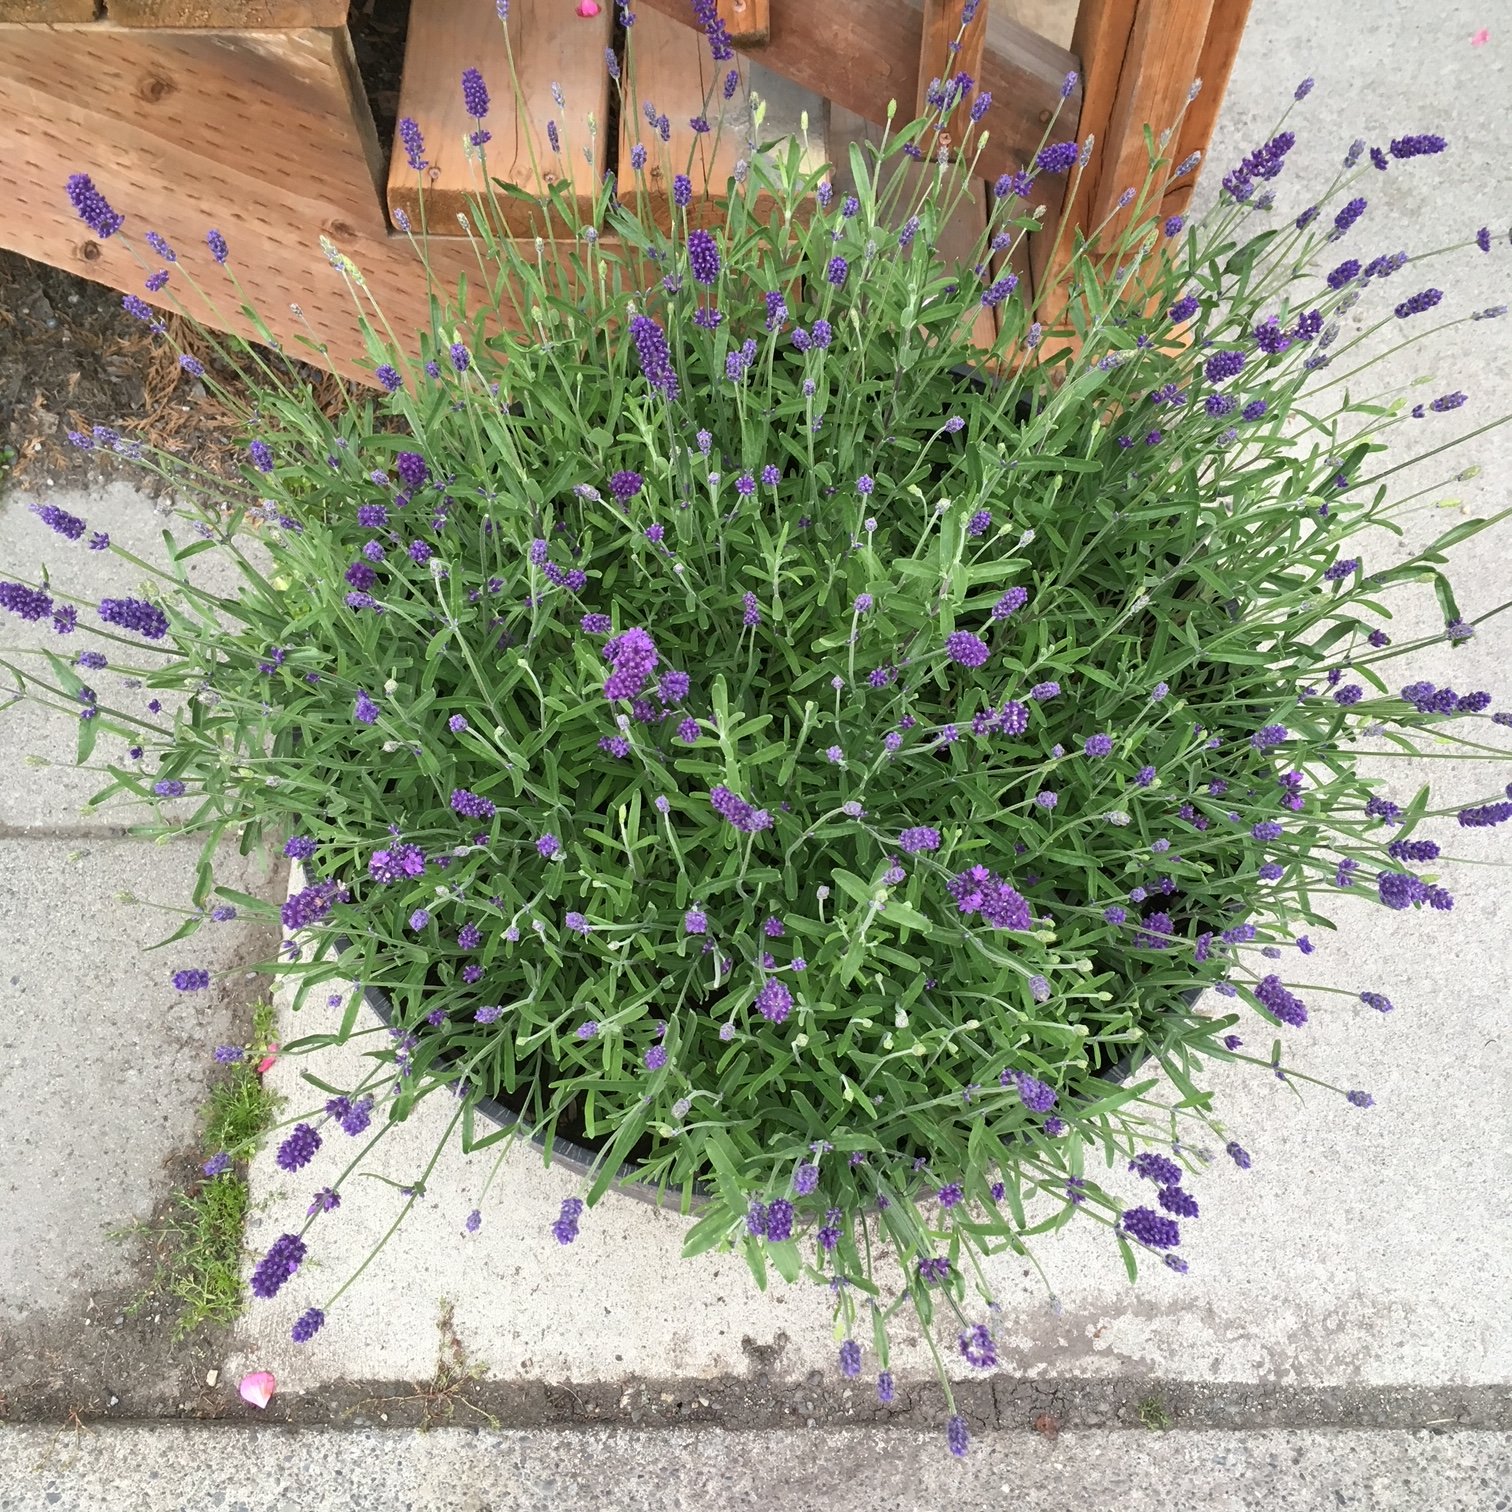
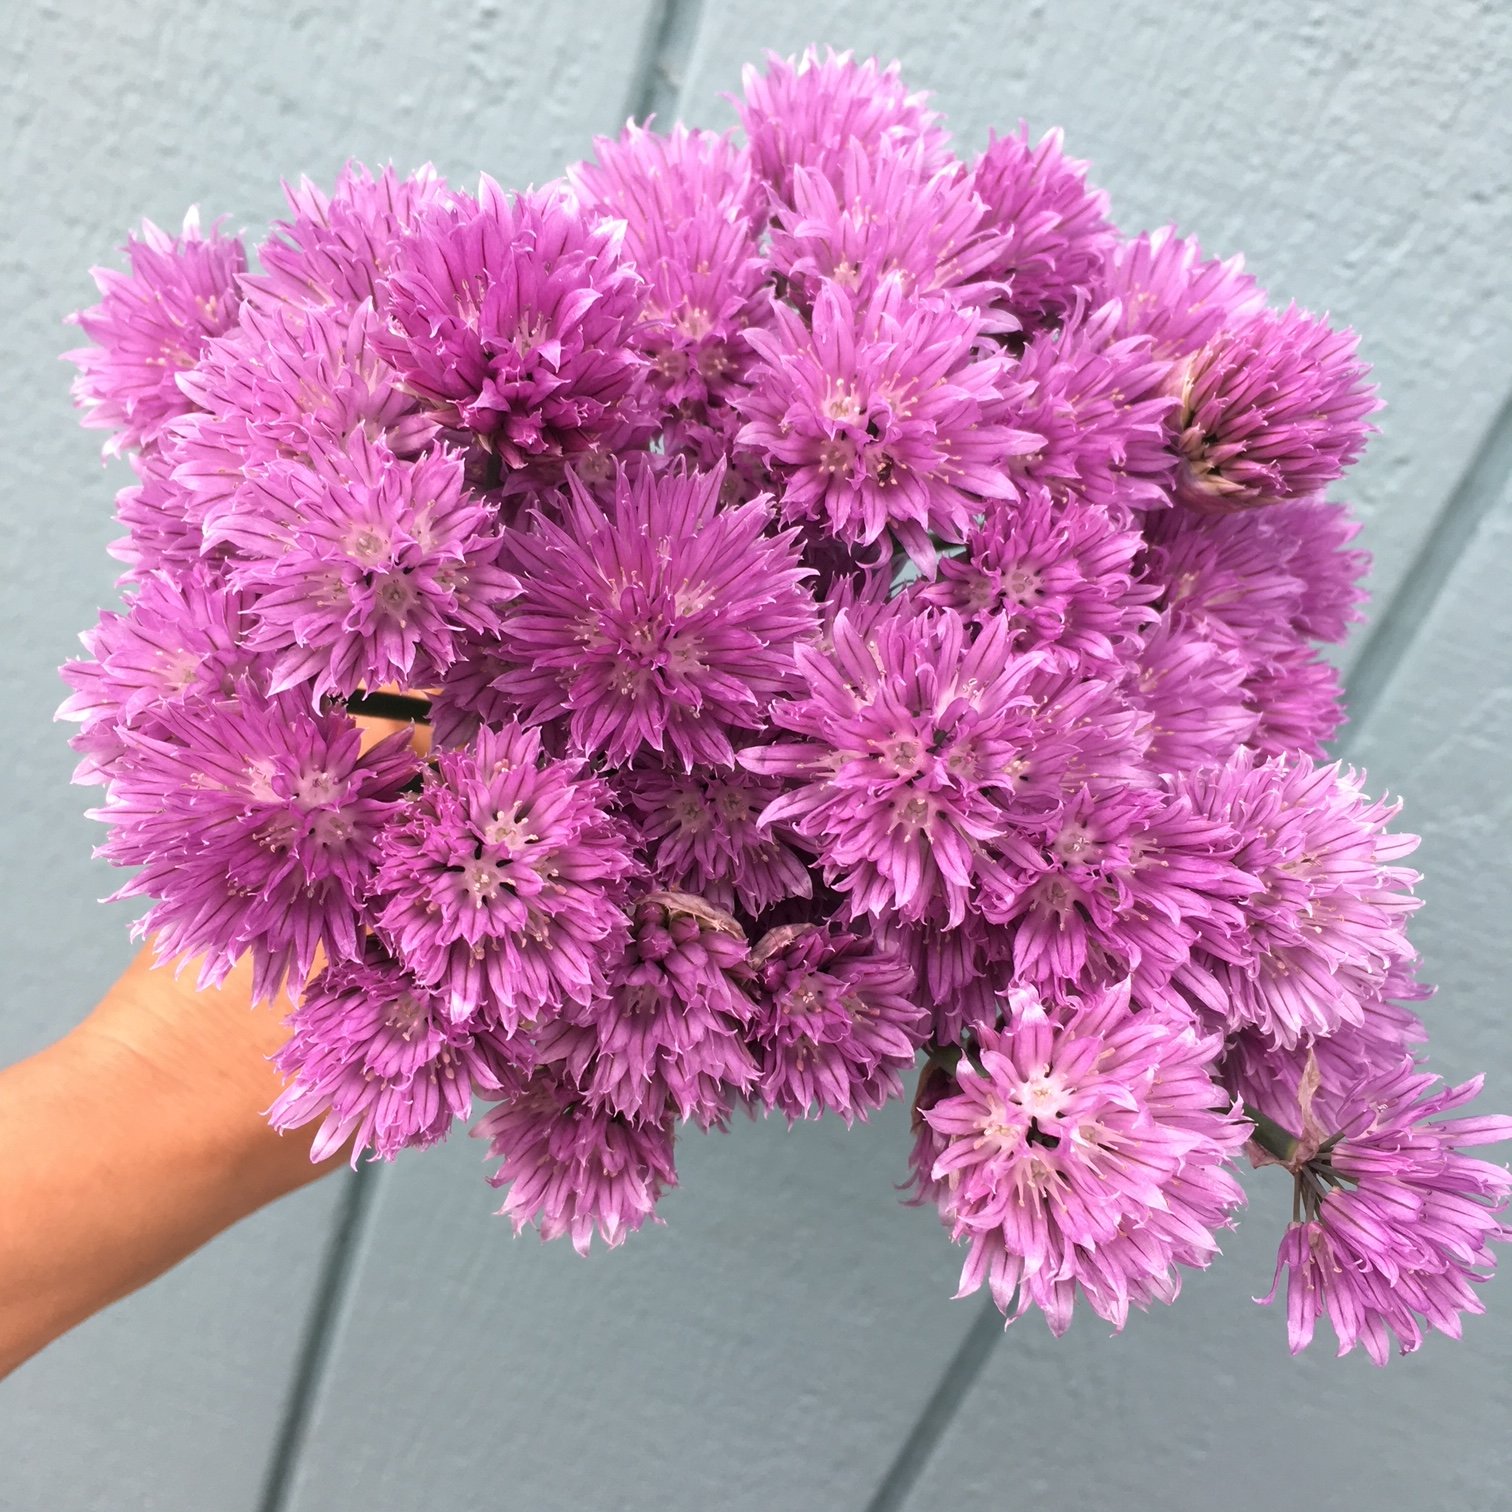
Left to right: Lavender thriving in a planter, Chive flowers - my mouth is watering just looking at these, Sage flowering big time in my home garden.
Plus a bonus herb I encourage you to try!
In addition to these fabulous and relatively easy-to-grow culinary herbs I also want to mention another favorite flower/herb: Lavender. I grow the Elegance variety.
Lavender is more challenging to grow in my northern climate. It is a slow grower and thrives in warmer temps.
This is one of the earliest plants I start by seed. I then make sure to plant it in a warm, sheltered environment which usually means in a pot on my super sunny front porch.
Harvest mature flowers for the vase or harvest each stem when flowers are budding if you want to hang for drying. Lavender keeps its aroma and color well after drying.
If you’re up for a challenge, try this amazing herb. The beauty, aroma, and happiness you will enjoy from this plant are priceless and well worth the difficulty!

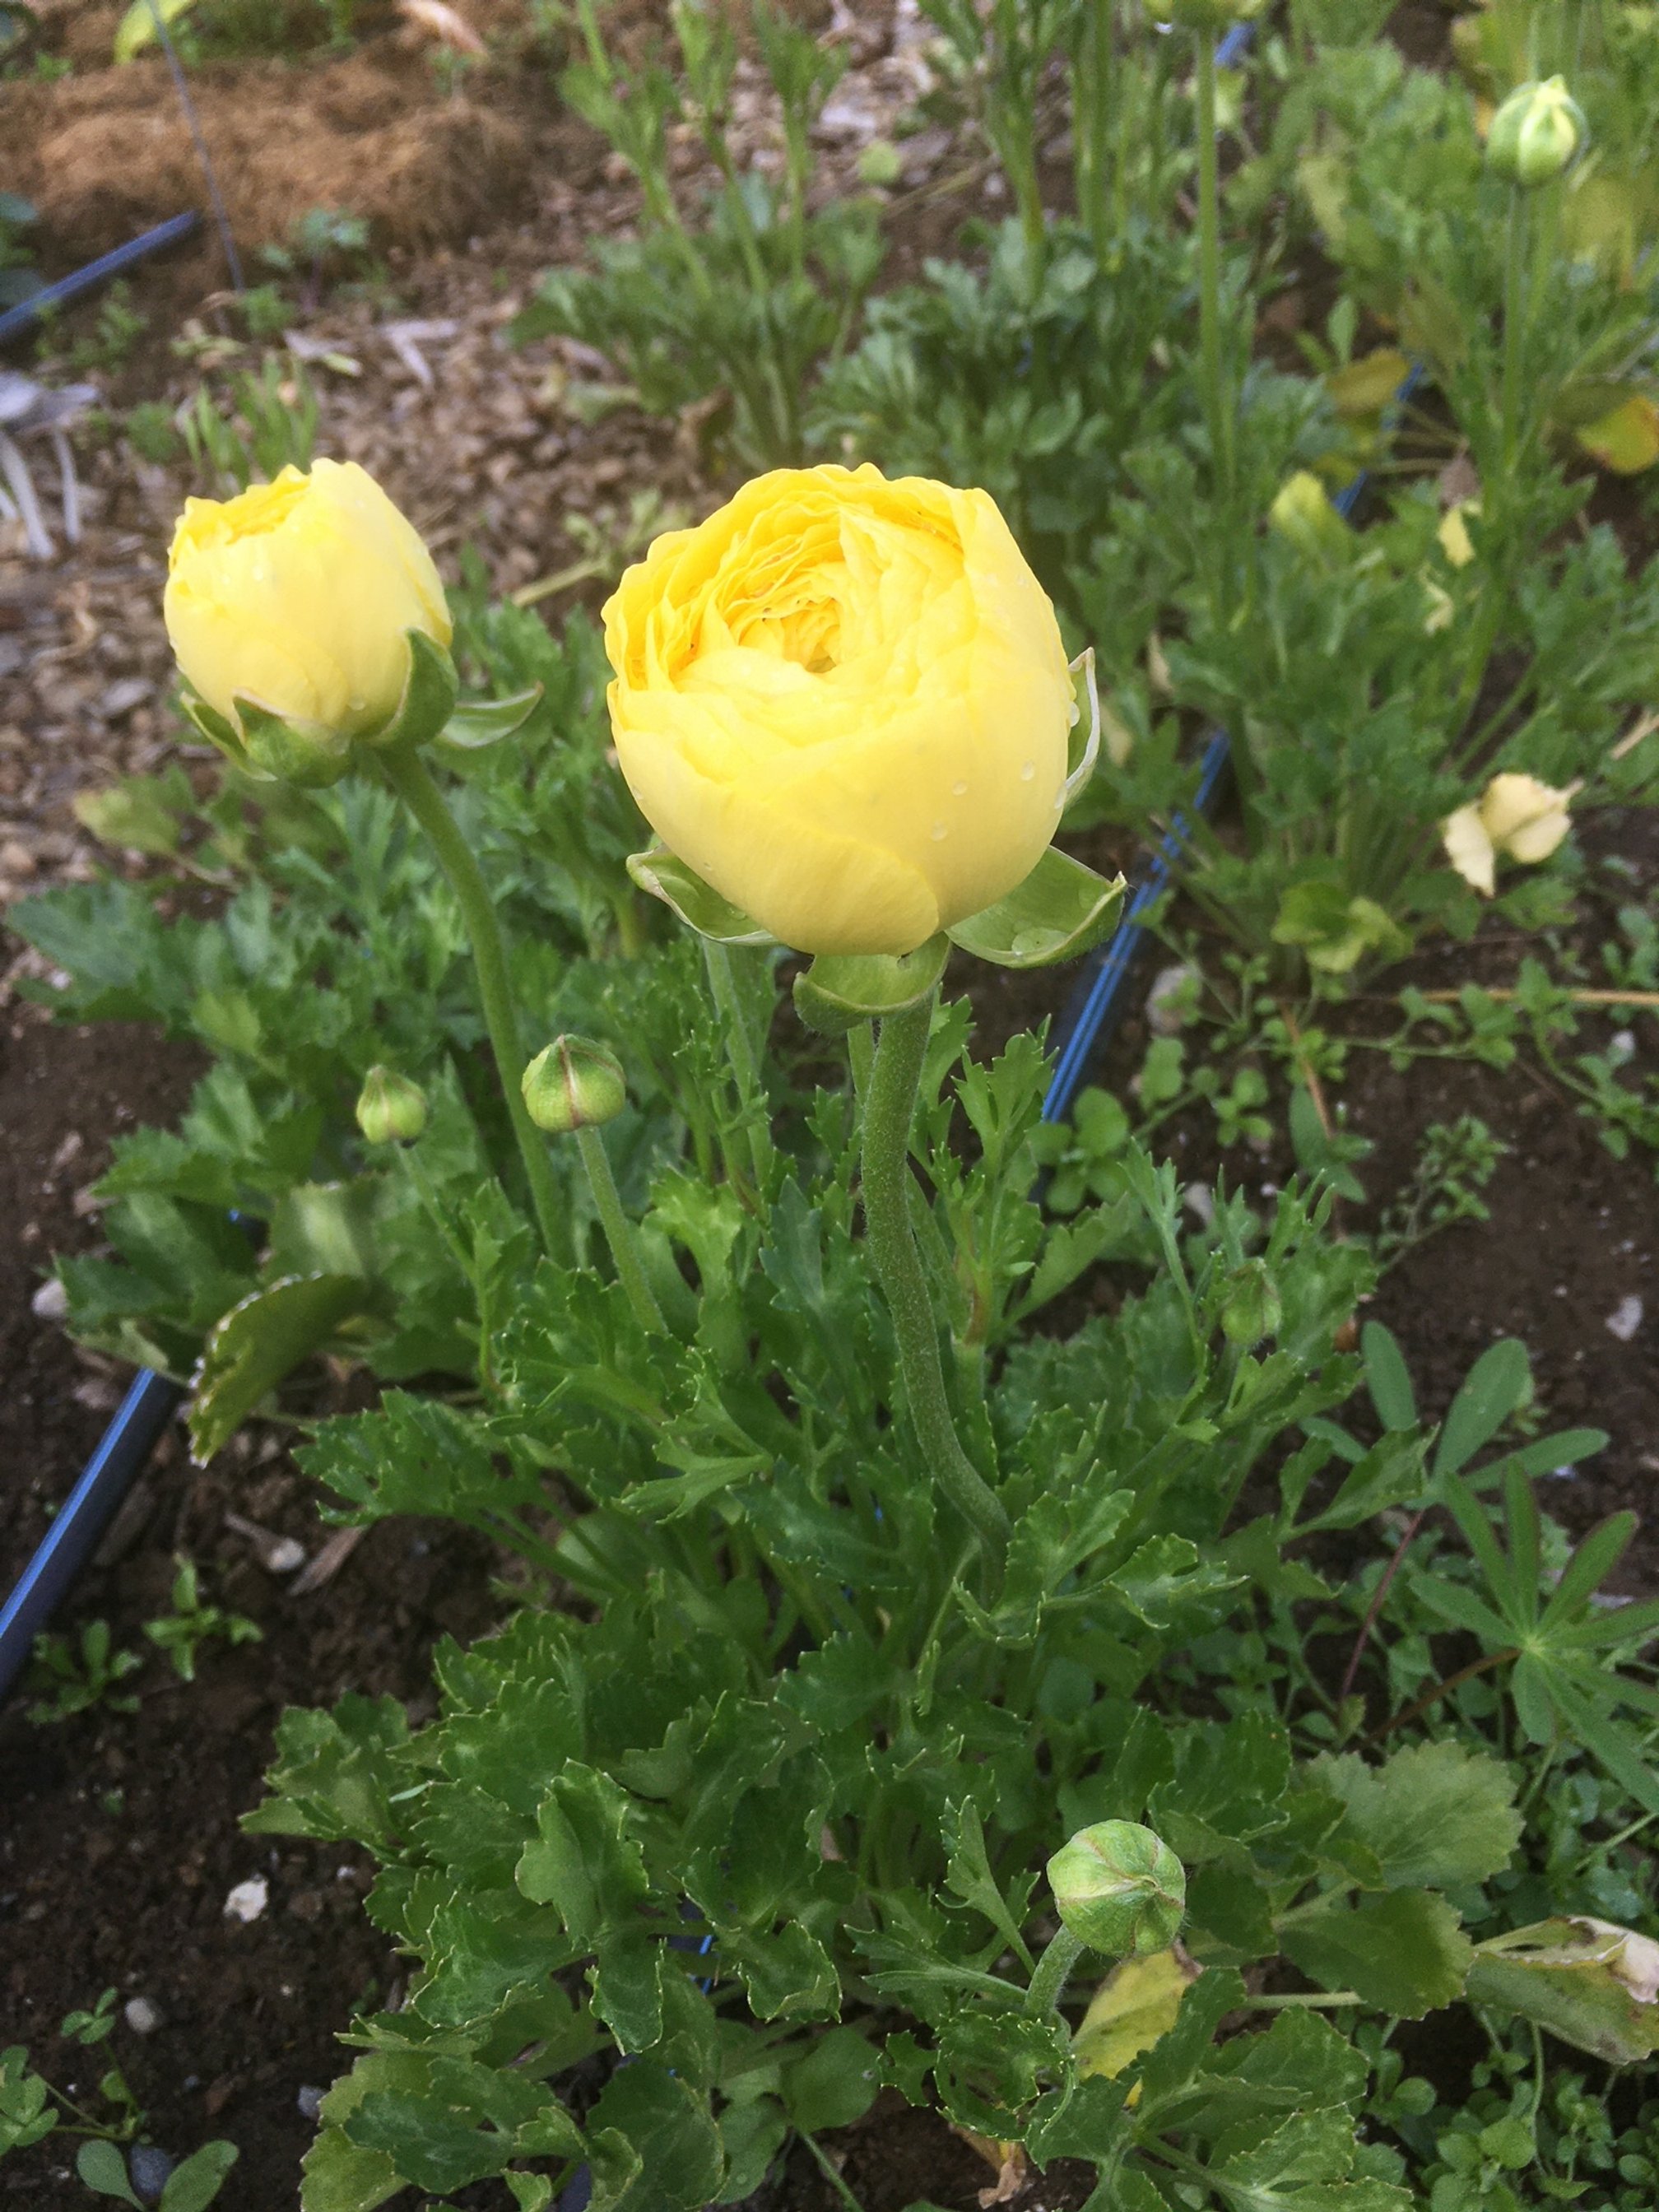
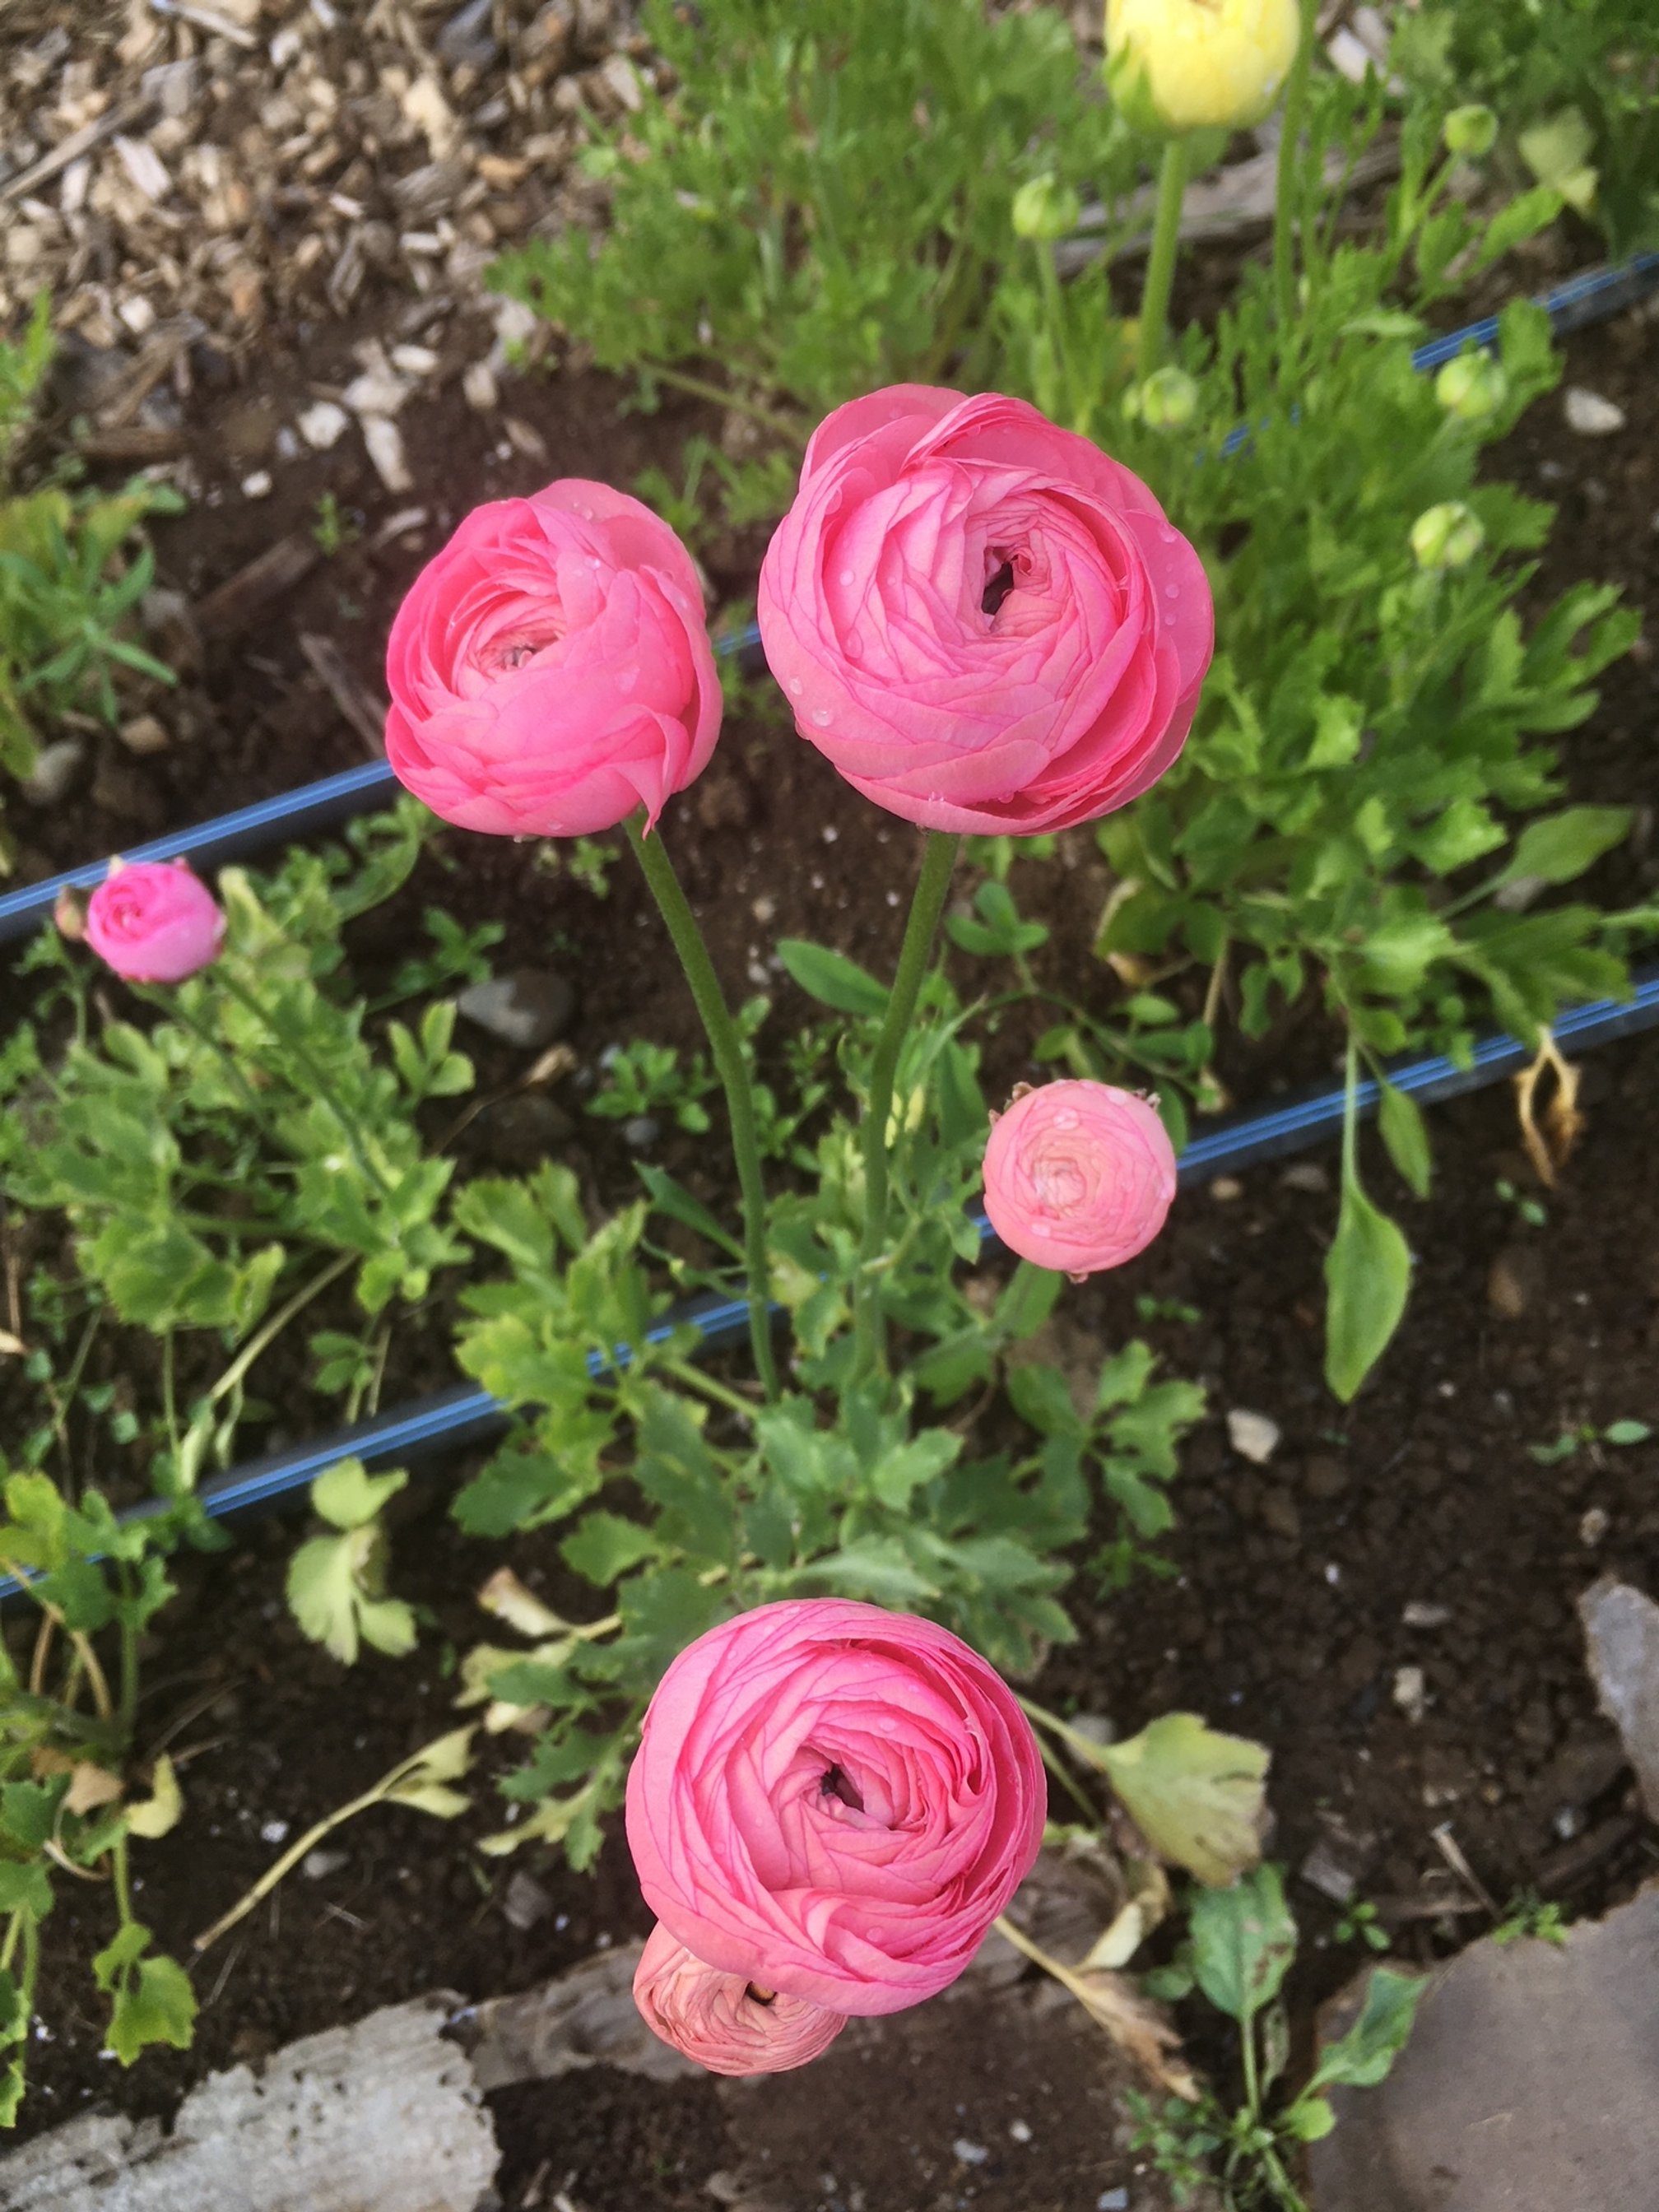
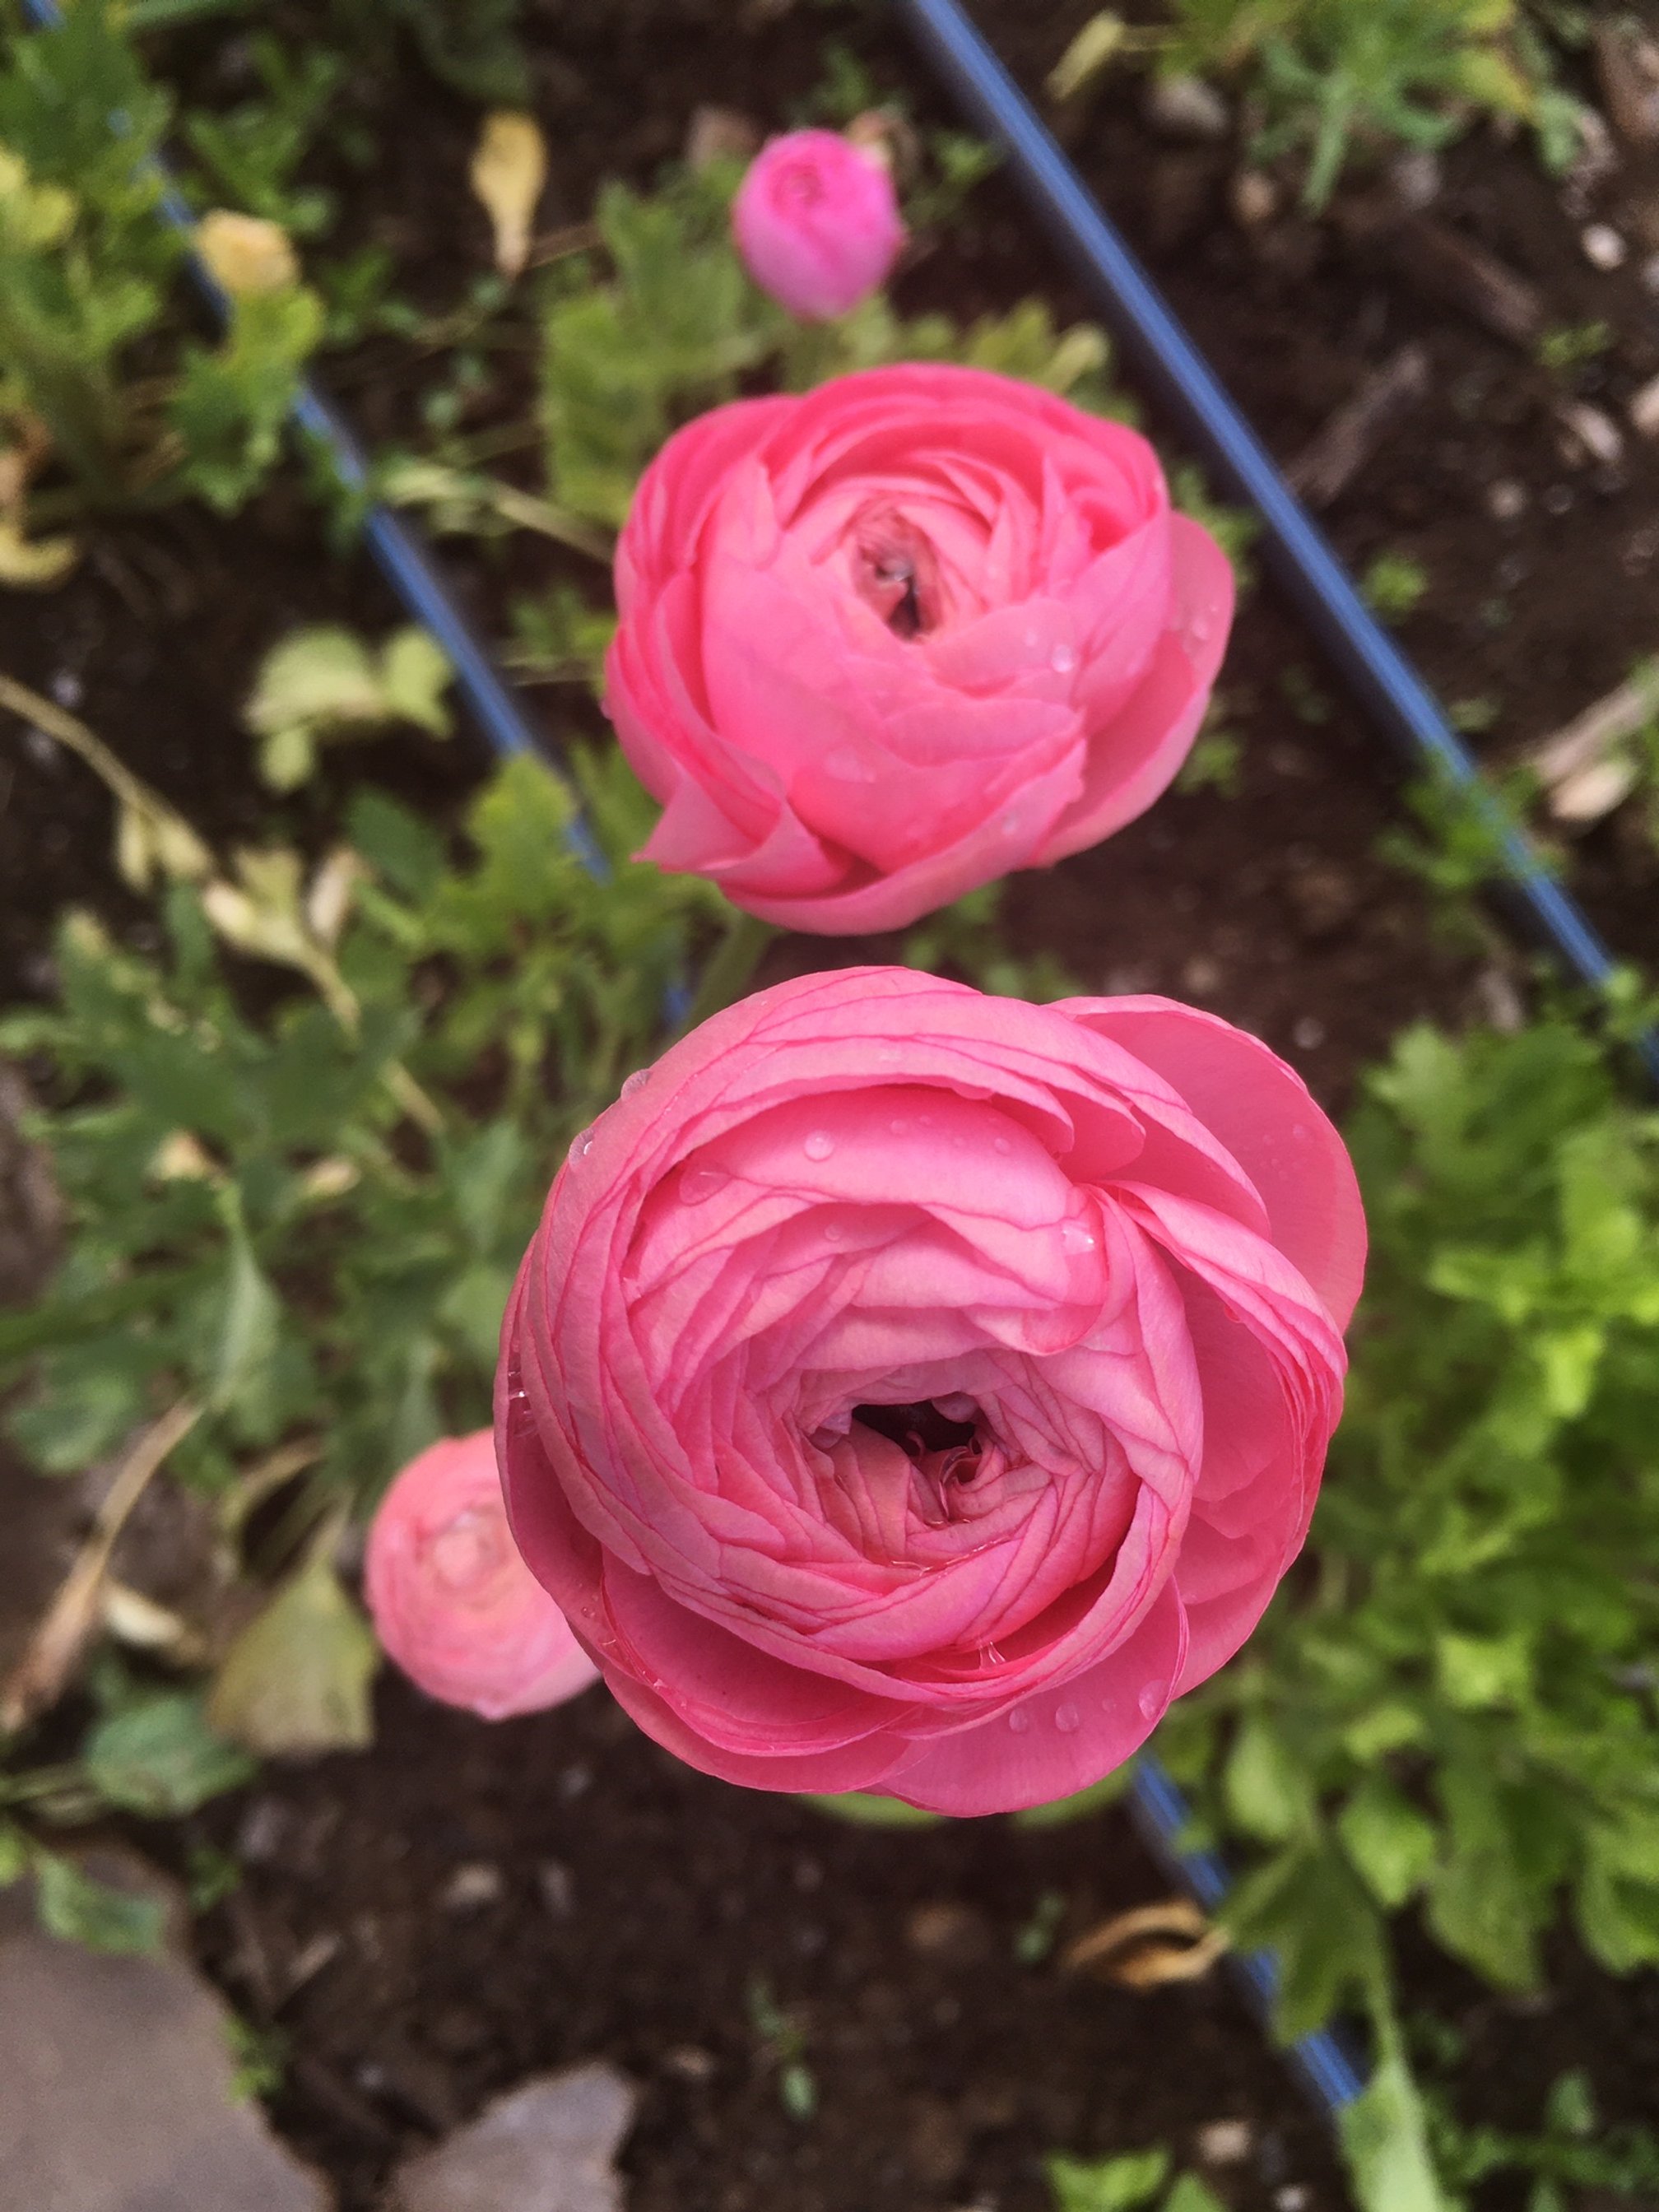
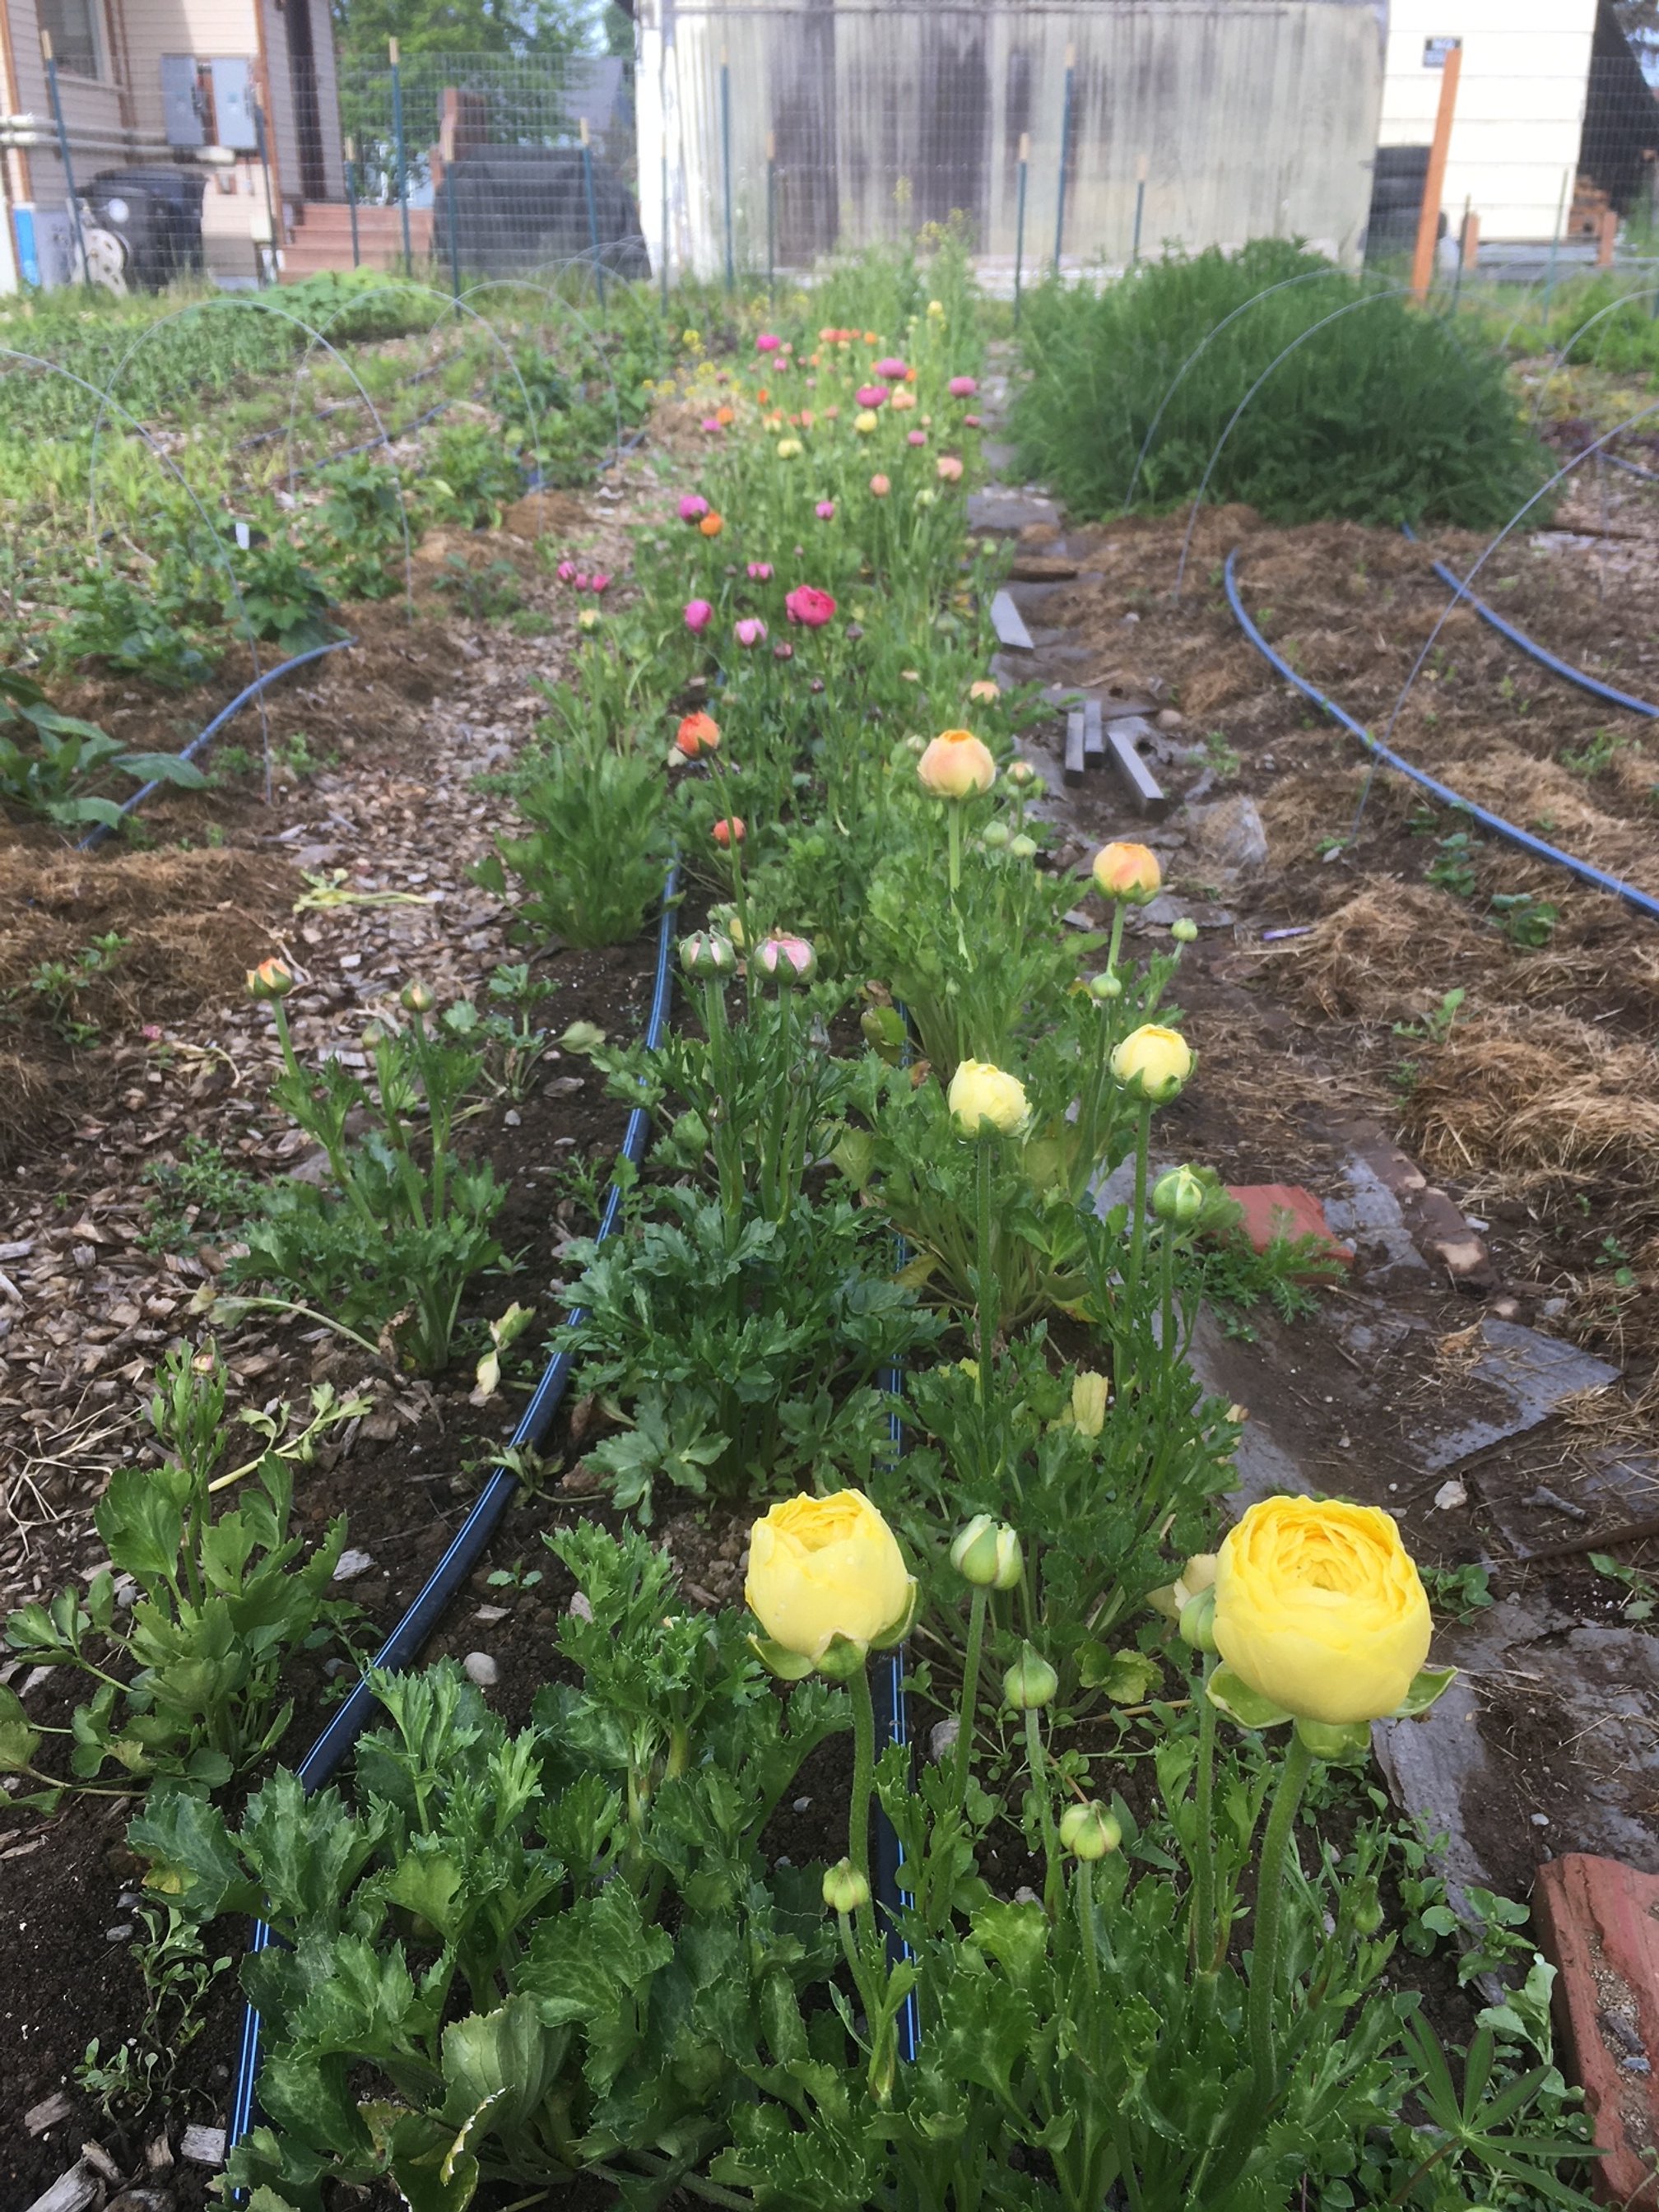
How to Grow Ranunculus
One of the most popular flowers right now in the modern florist and wedding flowers world has to be ranunculus.
And for good reason! These beauties are amazing. They have this multi-petaled rose-like quality and they last forever in the vase, especially when grown locally (like in your backyard).
Plus, as garden flowers, they are so bright and beautiful! I want to see these growing in more gardens around town.
I do consider these a more advanced flower to grow, mainly because the process of starting these is a bit different than other cut flowers.
But do not fear! I am here to walk you through the entire process. From ordering corms to harvesting blooms for the vase.
So let’s jump right in.
Where do I get ranunculus corms?
Since ranunculus is started by corms (root matter saved from the previous year’s growth), you must first source and order these.
I sell a mixed bag of 20 corms each spring. Be sure to hop on my email list HERE in order to get first dibs on all my sales. For 2023 I am selling Picotee varieties in purple, orange, and pink. I order hundreds of corms each fall and save my own varieties from year to year, so I end up with plenty to share.
If you’re looking for other varieties check out Ferna Farms. They are another small farm offering these awesome corms to home growers.
When do I start ranunculus corms?
I start all my ranunculus about 2 weeks before planting out.
My plant-out date will be early May, so I’m starting all my corms the 3rd week of April.
Once sprouted, these guys grow fast! Plus, they do well in cooler temps, so if covered, they can weather a few touches of frost.
How do I start them?
First, you’ll need to soak your corms.
What the heck does this mean? It simply means, popping your corms in a bucket, adding cool water, and letting them sit for about 4 hours.
Some farmers recommend gently agitating the water while they are soaking (using a fish tank bubbler or leaving a stream of water running). I’m here to say, I’ve done it without any agitation and everything turns out OK.
Once properly soaked, they will look relatively plump. Now you’re ready to pre-sprout.
Pre-sprouting consists of layering a grow flat with potting mix. I use ProMix seed starting mix (ideally organic if I can find it locally).
Once a layer of the mix is in the flat, place your corms root-side down in the tray. If you think of your corms as little octopuses, the “tentacles” go down.
You can place them pretty close - I do about 2 finger-widths apart. Then, cover them with soil.
Lightly water (err on the side of too dry than too wet otherwise your precious corms may rot) and place somewhere dark at room temp.
Check these daily. Once they have started to grow green shoots out of the soil, it’s time to place them under lights at about 16 hours/day or if your garden beds are ready for them, it’s time to plant.

Planting soaked corms in seed starting mix for pre-sprouting.
Ranunculus beginning to sprout and grow under lights.
How do I plant ranunculus in the garden?
After pre-sprouting your ranunculus, they are ready to plant in the garden. Gently loosen each corm from the potting mix, dig a shallow hole, and place them in your garden bed. I plant mine about 9'“ apart.
They will benefit from a general-purpose organic fertilizer and bone meal application at planting time.
How do I tend my ranunculus plants?
Ranunculus care is similar to other cut flower care. As they can grow taller, they will be susceptible to wind and heavy rain. I suggest staking or netting them in your garden. Or at least, planting them in a sheltered location, out of any spring or summer winds.
How do I cut my ranunculus for the vase?
Ranunculus is cut as soon as the flowers reach the “soft marshmallow” stage. If harvested too soon, they will not open. You can wait until they are fully open to harvest but their vase life will be diminished slightly.
Please know that you don’t have to cut for the vase. Ranunculus looks gorgeous in the garden! And they bloom prolifically until the heat of the summer comes on strong.
SPECIAL NOTE ON GROWING A FALL RANUNCULUS CROP:
I learned this technique from a farming friend in Norther Alberta who has similar summers to where I grow.
Since the first planting of ranunculus will most likely peter out in late July, I loved the thought of a second planting. Last year I tried it for the first time.
Here’s what I did:
I saved about half my corms (you can just hold them at room temperature in a paper bag).
Go through the same steps of soaking and pre-sprouting starting in mid-June.
Plant in the garden once they have pre-sprouted and tend normally.
If you live in an area with cooler summers, you will be blessed with a late crop that will bloom until the first frost!
10 reasons to grow a garden

Whether you’re a newbie to gardening, a wanna-be gardener, or an intermediate gardener who just needs a reminder, I’m here to…
1) offer a little inspiration for why we all need to tend a garden
and
2) show you how to be successful in any garden endeavor (CLICK HERE to check out my online gardening class, which goes on sale again in March of 2023)
Now for the inspiration part…
Here’s why to garden:
You’ll get regular low-intensity exercise: Here’s what your body does when your gardening: standing, squatting, bending over, walking all over, reaching, stretching, hauling, lifting, pulling, carrying, etc. Science tells us that longer periods of low-intensity exercise may offer more benefits than shorter periods of intense exercise. I’m not advocating you stop running or going to the gym but I am advocating that you create more enjoyable activities in your life that keep you moving and standing (just pretty much anything besides sitting on your duff).
You’ll feel a sense of accomplishment: In a fast-paced world loaded with tech, creating something with your hands that YOU can harvest for your family is truly sacred.
You’ll get more outside time: Most people spend their whole days working inside. Being outside is a true balm for the soul. Having a garden to tend to, kind of like having a dog to walk commits to you spending more time outside.
You’ll meet your neighbors: If you garden in your front yard I guarantee you will get to know your neighbors well! This is such a fabulous byproduct of gardening.
You’ll teach your kids solid life skills: Here’s what your kids can learn from a backyard garden: responsibility, love of nature, care of living things, curiosity, cooperation, self-sufficiency, that veggies taste good, just to name a few. Plus, once someone knows how to garden, they’ll know it forever (just like riding a bike). Imagine giving your kids the gift of being able to grow their own food!!
You’ll eat the healthiest food on the planet: If you grow using my methods… organically and with solid soil-building techniques, your vegetables will be loaded with nutrition. The health of the soil directly affects the nutrient density of your food.
You’ll eat the most delicious food on the planet: I’m not surprised why some people don’t like vegetables, especially if their only method of consumption is through frozen or “fresh” veggies from the grocery store. You guys, if you haven’t experienced fresh garden strawberries or fresh garden peas, or fresh garden anything YOU are missing out on a culinary wonder. Veggies were meant to grow, pick and eat immediately. Yes, it is great to learn to store them for later too but let’s face it, if you are growing your own veggies, you will eat way more veggies because they are so damn good. Make eating healthy easy! Start with superb taste by growing your own.
You’ll enjoy beauty every day: Now, technically this is possible to do every day without a garden BUT gardening has the opportunity to enhance our yard so beauty is EVERYWHERE. Plus, if you follow my steps to start growing your own cut flowers, you can fill your home with beauty too. Fresh flowers smiling at you from your kitchen counter is truly a beautiful thing.
You’ll feed pollinators: Bees and butterflies and other beneficial insects love gardens. They love flowering gardens. So let your herbs go to seed, let your mustards and broccoli go to seed (after you’ve harvested some of course), plant flowers, and your yard will be a playground for all the good bugs. Good bugs help pollinate our food crops and they eat other not-so-good bugs.
You’ll have gifts to give: My neighbors grow tons of basil and garlic and every year all of us neighbors on the street get the most amazing jar of pesto. Sharing your garden’s bounty is one of life’s greatest pleasures.
So there you have it.
I hope I’ve convinced you how amazing growing a garden can be.
And now, I want to personally invite you to join my March 2023 launch of The IncrEdible Garden Course - a three-week online course designed to teach you the fundamentals to create a backyard oasis full of food and flowers your family will love.
GO HERE to learn more!
Tried & True Garden Varieties
Giant Orange Marigolds.
In order to get you growing an amazing and fail-proof garden, I want to get you started with some of my tried and true varieties.
Since I’m a flower LOVER and flower grower this list will be flower heavy. BUT I also want you to have some of my favorite varieties for your veggie garden.
Over the years I’ve rubbed shoulders with vegetable farmers (quite literally - my husband managed a large vegetable CSA at the same time I started my flower farm) and tested different varieties myself.
Often just choosing the right varieties will set you up for success in the garden. And with SO many fun and beautiful varieties out there - how do you know what to choose?
By putting your ear to the ground and being committed to experimenting!
Wiser growers than I have told me to commit 20% of my farm to new varieties. I’m recommending this to you now too.
Don’t go overboard with new stuff - then you risk wasting too much valuable garden space to varieties that you’re not actually sure will produce well. Stick to tried and true varieties and dip your metaphorical toe into fun and exciting new ones each year.
So now on to my tried and true varieties that I know, you’ll love.
First, for the flower garden:
Ammobiom

Ammobium aka Winged Everlasting.
Centaurea - Classic Magic, Blue Boy OR Black Button
Calendula - Orange Button
Cosmos - any Double Click Variety
Cynoglossum - Chinese Forget-me-not OR Firmament
Dill - Bouquet
Ornamental Grass - Frosted Explosion
Marigold - Giant Orange
Nasturtium - Trailing
Nigella - Albion Black Pod
Poppy - Breadseed OR Shirley

Shirley Poppy.
Rudbeckia - Cherokee Sunset
Saponaria - Pink Beauty
Scabiosa - Black Knight
Snapdragon - Potomoc varieties OR Madame Butterfly varieties

Bunches of Potomac Snapdragons.
Strawflowers - Copper Red OR Purple Red
Sunflowers - Procut varieties OR Sunrich varieties
Now for the veggie patch:
Beets - Touchstone Gold & Chiogga
Broccoli - Belstar

Belstar Broccoli just starting to grow crowns.
Carrot - Yaya
Cilantro - Calypso OR Cruiser
Cucumber - Diva OR Socrates
Kale - Red Russian OR Lacinato (also called Dinosaur or Black)

Red Russian Kale co-housed with Dahlias.
Peas - Sugar Ann OR Sugar Snap
Pumpkin - Cinnamon Girl
Spinach - Corvair
Tomato - Sun Gold
Zucchini - Dunja OR Blck Beauty
There you have it! This is by no means a comprehensive list but it’s meant to get you on the right track to a highly productive garden this season.
So now on to ordering seeds! GO HERE to read all about my favorite places to place your order.

5 of my Favorite Edibles!
Flowers are not just food for the soul! They can also be REAL food. In fact, my two kiddos DELIGHT in plucking a flower and munching.
I want to share 5 easy flowers that you can grow AND eat!
Flower petals can be used fresh or dried for garnish during the cold, dark winter months.
Aside from nasturtiums, which are completely edible (leaves and stems), be sure to eat only the petals of these flowers.
Calendula
Tangy and slightly bitter, you can add these petals to sweet or savory dishes.
An easy to grow and prolific bloomer. They also readily self-seed in the garden for years after your first planting.
Direct seed in the garden after last frost OR start indoors 4-5 weeks before last frost (which in my neighborhood is around May 15th).
Plant in the garden or in planters giving about 6-9” of space between each plant.
Bachelor Buttons
These flowers are delicate and whimsical and are always one of the first to bloom! They are mild and sweet.
Direct seed as soon as soil can be worked or start indoors 3-4 weeks before last frost.
Plant out about 6-9” apart in the garden or in planters. Be sure to stake as these grow tall and can easily topple in a wind storm.
Calendula comes in colors ranging from pale yellow to rich orange.
Bachelor Buttons are one of the first annual flowers to bloom in the garden.
Snapdragons
Snapdragons are a workhorse in my flower garden. They come in many colors, last a long time in the vase, are cold hardy AND you can eat them. They taste a bit bitter and floral :) Add a few as garnish to salads, deserts or drinks.
I would say these are for the intermediate grower. They can be tricky to germinate so plant a few seeds per cell or pot. Press the seed gently into soil but don’t cover as this seed needs light to germinate.
Start these early! I’m planting my first succession (a succession is simply anytime you seed a specific variety) the 3rd week in March. I’ll do two successions about 3-4 weeks apart.
Space about 6-12” apart in the garden. Be sure to pinch when plants are 4” high - this will give you a branching plant with lots of blooms!
Nasturtiums
These guys are the classic edible. They taste a bit spicy and both the flowers and the leaves look amazing on a salad.
Plant directly in a pot or in the ground 2 weeks before last frost OR start indoors 3-4 weeks before the last frost.
Cover seeds, as they require dark to germinate.
These look amazing anywhere in the garden, in planters or hanging pots. Plant about 3 plants per 10” pot or space 8-12” apart in the garden.

Nasturtiums: a bright and cheery addition to your salad.

Snapdragons come in tons of colors!
Sunflowers
Not only can you eat the seeds, you can eat the petals! They are bittersweet and will brighten up any salad or dessert.
One of the easiest flowers to grow. They do great in pots (but will be shorter and smaller), or in the garden. Folks tend to think these need to grow super tall! I personally love these to be more manageable for the vase so grow them closer together (6” apart).
Direct sow in the garden after last frost. You can also start indoors 2-3 weeks before planting outdoors. They grow fast, so don’t start too soon!
Two of my favorite varieties for the vase are ProCut Orange and ProCut Gold and Sonja. If you’re looking to grow seeds, go with Standfast from Fruition Seeds.

Sunflowers (edible) & zinnias (not edible) harvested off our old farm in WI.

Sunflowers on our old farm in WI.

Three ways to turn your lawn into garden!
Slowly my yard is being taken over by garden… veggies, flowers, fruit trees, berries. Every year I adjust, move and hone my current gardens and slowly get rid of lawn.
This year is no different! In fact I’m planning to turn WAY more lawn into garden especially due to the recent turn of events. Food security has always been important to me, but now more than ever I’m taking it seriously.
If you’re also looking to add more food or flower production to your yard read on to find a few ways I’ve dealt with getting rid of that pesky grass.
The Smother Method: Sheet Mulching/Lasagna Gardening
This is a nice way to passively smother the grass. In its basic form sheet mulching can just be a 1/2 inch layer of cardboard or newspaper on top of your lawn to smother the underlying grass.
From here you can go a couple directions: 1) amend with the proper layers for a lasagna garden or 2) top with soil and plant directly into that.
If I’m making raised beds, I’ll build my boxes right over the sheet mulch. This will ensure that no grass grows up into the boxes.
First of all stock up on cardboard (bike shops are a great place to grab lots of cardboard as all new bikes come in a huge box) or newspaper and lie that over the area you’d like to garden. It’s a good idea to do two layers of cardboard and closer to 6-8 layer of newspaper just to be safe (invasive grass can be extremely tough!).
Once the cardboard id is down, water it throroughly. Then layer from bottom to top in this order:
1) organic fertilizers per your soil test - if you absolutely don’t want to mess with a soil test you can add an all purpose one - just follow the directions on the box.
2) manure or compost
3) straw or dried leaves
4) grass clippings
5) compost or manure
6) more leaves or straw.
Water again thoroughly. I’d let this set for 2-3 months. Or if you can, let it set and decompose all summer. And you’ll have a killer garden next spring!
If you want to plant directly, add a few inches of garden soil on top of the last straw/leaf layer and plant away.
Solarization
This is a low-labor and passive method for getting rid of lawn. You can also use this in an established garden bed if you’re having excessive weed problems. The sun shines through the plastic, heating up the underlying plant material enough to kill it.
First thing after the snow melts, cut your grass short where you are planning to build your garden and water thoroughly. If the grass is already cut short from the previous fall, don’t worry about this step.
Buy or scavenge a piece of clear plastic (I tend to hoard plastic scraps for this very purpose). The bigger the better. If pieces are too small, it’s harder to weigh therm all down and you might lose some in a wind storm.
Cover the entire garden-to-be area in plastic and weigh down with rocks, lumber, fire wood, or anything else. This is probably the most important step, as you don’t want wind to pick these up and move them around. This will lead to frustration and lots of tedious work on your end!
The plastic does need to be clear - the sun shining through the plastic will heat up the underlying grass - killing it!
Now wait for 4 weeks and check! Be patient. Once the underlying grass is dead (it will turn green to yellow to brown) you are ready to garden.
Give the area a shallow till (not too deep as you may mix up deep weed seeds) or just plant right into the dead matter. I don’t advocate for regular tilling BUT it is useful to establish your new garden beds and to mix in soil amendments for the first year.
Sod Removal
This is a labor intensive method but will give you a usable garden space quickly as you don’t have to wait for the grass to die off as you do in some of the above methods.
You can either rent a sod cutter from the hardware store or manually cut and dig the sod. Once sod is removed, you can amend the soil as needed (with compost and fertilizers) and plant directly! For the first season of planting, you can double dig, rototill or broadfork (this you can do every year without any soil damage).
Then plant away!
Note that all these above methods can be used to create in-ground beds OR you can build up to make raised beds. In-ground beds are simple and inexpensive. Raised beds will heat up a little quicker in the spring and provide better drainage but you’ll have to pay for the lumber or material to build up the sides plus bring in additional soil.

Planning Your Dream Garden
I know it’s the middle of winter but believe it or not, it’s time to plan your dream garden!
To be honest, here on the farm this is a HUGE undertaking. Every year it gets a bit easier but I am always surprised by the time this takes.
As a home gardener your task is a little simpler but give yourself time and have fun!
I want to break down your garden planning job into a few smaller tasks. Next to each task I will have a description on how I do this and a link to an actual PDF sample of my planning tools.
1) Make a crop list. List all the crops you are going to grow!
How do you decide? I like to grow things I like to eat! Start there then browse through your seed catalogs and find a few other things you might like to try.
How do you choose varieties? Read about each variety carefully. For Alaska, shorter days to maturity is important especially with very long season crops (like tomatoes). Also try to read between the lines. What are the descriptions NOT saying. For example, I tried a short season cucumber advertised as a great variety for northern growing. Sure win right? Not quite. The flavor and texture was almost unpalatable. Our chickens feasted on those.
I make a simple spreadsheet with the following information on it: crop (i.e. broccoli), variety (Belstar), source (where I bought my seed), days to maturity or DTM (you’ll see this in the description online or on the back of the seed packet), weeks to maturity WTM (just divide your DTM by 7 - I like to do this cause it’s way easier to count back by weeks than for days to figure out when you need to plant), notes (YOU MUST TAKE NOTES THROUGHOUT THE SEASON ON EACH CROP).
CLICK HERE to see a sample of my planing spreadsheet! I have left on a few extra columns here in case you want to add these on yours too.
2) Draw your garden. Sit down and draw your garden!
I like using grid paper for this. Then each grid increment can be a 1 foot or 6 inch increment. OR you can just draw on plain paper and just mark off your actual garden dimensions.
Pencil in where you want each of your chosen crops to grow. Remember to think about taller plants (or plants that need to be trellised) - place these on the north side of your garden so they don’t shade smaller crops. Crops that stay in the ground the whole summer (like broccoli or potatoes) can be further away from your paths than crops you might harvest more often (like salad greens).
This helps you plan where things go and how much you can fit in your area. This also becomes a record (keep your dated drawings) so you can rotate where you grow each crop in subsequent years.
3) Make a planting calendar
CLICK HERE to see a sample of my planting calendar. I plan by week. Week 1 is the first week of the year - using week numbers (and not just dates) is helpful in order to use past planting calendars to plan for future planting dates since actual dates may fall into different weeks each year.
In order to make sure I’m seeding things when I need to I usually start by planning when I want to harvest each crop.
For example, if I need all my broccoli harvested by September 1st, I’ll count back its weeks to maturity (days to maturity/7). If broccoli has 66 days to maturity (or 9.5 weeks to maturity) I will make sure my plants are planted in the ground by the end of June. Note that since broccoli is usually started indoors, I need to add additional time for germination (maybe a week) and indoor growth (a few weeks). So I would start my seeds the first week of June.
Remember you don’t want ALL your beans or broccoli or whatever to be ready at once, so stagger your plantings. Each plant is different but Johnnys and High Mowing, two of my favorite seed saving companies, are usually good at suggesting how far to stagger your plantings in order to get a steady supply of crops all summer.
CLICK HERE to read my previous blog all about ordering seeds.
A note on days to maturity (DTM): DTM is a best guess the seed company can give based on when the plant goes in the ground. Crops usually direct seeded (salad mix, peas, beans, carrots, etc) have a DTM from date sown. Crops usually transplanted (cucumbers, tomatoes, etc.) have a DTM from the time you plant them in the ground. I know this is a bit confusing so remember to use DTM as a guide but not as a written-in-stone rule.
So there you go! Now you’re ready to get started planting.

Do you need holiday gift ideas?! Here are 5 Favorite Books from my Gardening Library
Looking for that special gift for a gardening friend?! Or need an addition to YOUR gardening library? I’ve got you covered this season.
While I know it can be overwhelming to sift through ALL those gardening books (there are so many), when you come across a winner it can be SO valuable in helping your skills grow.
Here you can see a handful of my favorite books that are currently on my farm/garden library shelf.

1) Cool Flowers by Lisa Mason Ziegler.
Flower growers this book will blow your mind! It will debunk all sorts of conventional advice on when to plant your flowers. Use this book to grow super hearty blooms that are ready to enjoy from EARLY in the summer to LATE in the fall. A perfect how-to in a compact book. Flower gardening
2) The New Organic Grower by Eliot Coleman.
I grow organically. And as far as I’m concerned there is no other way to grow (or eat for that matter). No one needs more toxic chemicals in their lives.
At some point down the road I might move toward certifying my farm but at this point I’m too small for it to make financial sense. BUT I follow organic guidelines and Eliot is the man to learn from if you need some extra info!
In addition, he grows in a cold climate so has pertinent information on northerly food production. A CLASSIC READ THAT NEEDS TO BE PART OF EVERY GARDENERS LIBRARY. Vegetable gardening
3) Mini Farming: Self-Sufficiency on 1/4 Acre by Brett Markham.
Ok, I admit when I read titles like this I tend to roll my eyes. But my husband bought this book awhile ago and when I was hungry for something to read I picked it up and was 1) surprised how much I learned and 2) a little taken aback that I hadn’t read it sooner!
The chapter on compost alone is worth the price of the book. I’ve read a lot about compost (and honestly have struggled with implementing a good system on my farm) but for some reason this book really made composting make sense (finally!) and simple.
In addition, you will learn how to grow way more veggies on your tiny urban plot by following Brett’s guidelines. Vegetable gardening
4) Grow your own cut flowers by Sarah Raven.
Although Sarah writes from the perspective of growing in a much more temperate climate, this comprehensive book is loaded with valuable information for every flower gardener.
It is conveniently organized by flower type so is easy to reference. She also throws in some great info on cutting and arranging from your garden flowers! Flower gardening
5) The Flower Farmer: An Organic Grower’s Guide to Raising and Selling Cut Flowers by Lynn Byczynski.
Although this is meant to be a manual for commercial flower growers it is loaded with gorgeous photos and packed with GREAT information for every flower grower. In fact, the person who recommended this book to me was a home gardener!
Lynn gives the home gardener a simple plan for a personal cutting garden, covers everything you need to know to grow great flowers and has fun profiles on flower farmers from around the country. Flower gardening
Have other favorite gardening books YOU want to share?!
Leave a comment below. I love to read and am always looking for more books to add to my library.

10 Must-grows! My absolute favorite varieties from the 2018 flower cutting garden
The end of the growing season is a good time to reflect on what went well and what needs improvement for next year. There is simply nothing that compares to learning things from experience, sometimes the lessons are hard and other times they are joyous.
I’m going to focus on the latter and share with you my ABSOLUTE FAVORITES from my 2018 cutting garden. These flowers stunned me every time I entered the garden with their productivity, abundance and beauty!
Tickseed (Coreopsis hybrida): this lovely small and abundant flower is GREAT for cutting. It is full of small one inch blooms that will transform from tiny bud to flower in the vase for a super long lasting cut. In the garden this flower looks full and bushy and has colors ranging from white to yellow, to orange and red.
Breadseed Poppy (Papaver somniferum): a super easy to grow flower transforms from a large and delicate lavender flower with a grape colored center to HUGE poppy pods that look super cool cut in a bouquet or dried for a fun project later.

Madame Butterfly Snapdragons (Antirrhinum majus): snapdragons love growing in Alaska - they like relatively cool weather. Mine bloomed continuously from early July through the end of October!! This variety is an open faced frilly bloomed version of the standard snapdragon. I just LOVED these flowers. And they would look great as a dessert topping as snapdragon blooms are edible.
Amaranth - red spike (Amaranthus cruentus): A fun deep red/burgundy grain that looks stunning in arrangements and in the garden. Very easy to grow!
Cerinthe - kiwi blue (Cerinthe major purpurescens): This was my first season growing cerinthe! It is a great early season bloomer. Blue/green foliage with tiny blue/purple bells. So fun!
Dahlias: Linda’s Baby: a pinkish-orange specialty dahlia that is SO prolific in blooms, you will be amazed. Nice and long stemmed for cutting.
Cosmos - double click cranberry (Cosmos bipinnatus): Deep burgundy/pink double blooms that bloom mid summer till first frost. Huge plants and plentiful blooms.

Nigella - love in a mist (Nigella damascena): A fun flower that ranges from blue to white (it is so hard to find a true blue flower and here is one!). You can cut in flower stage or wait for the seed pod to emerge for a funky floral addition to your dining room bouquet.
Rudbeckia - cherokee sunset (Rudbeckia hirta): Simply big and gorgeous! Although the wait for blooms always seems long, they are well worth it. Big, showy burgundy to yellow double or single blooms that have a long vase life and long bloom time on the plant. Very hardy - these can be planted before the last frost.

Dusty miller - new look (Senecio cineraria): These will be looking great till the end of October this year! they’re an easy all season frosted leaf that looks great cut in a vase or in the garden. You can even dry them for making wreaths or dried bouquets.
If 10 varieties seems a bit daunting to you, pick 5 and add them to your garden next year!
I will advise that the garden stores might not carry these varieties, and that’s why I highly recommend starting your own seeds. Then you can grow EXACTLY what you want to grow.
Leave a comment here telling me 2 of YOUR favorite flowers to grow!

Spring Fever: 5 Veggies you can Plant NOW (Before the Last Frost)
I’ve been talking to folks lately who are antsy to get into their gardens but are waiting till the last frost (usually sometime in mid may).
Don’t wait! There are hardy vegetables you can sow now for early season bounty. Get fresh produce from your own yard weeks before your neighbors by planting these crops now:

1) Peas: plant as soon as the soil can be worked, 1-1 1/2” between seeds in rows 12” apart. Plan and install your trellis early, as growth can come on quick once they’re up. Keep in mind that as they grow they will cast shade onto whatever crop is north of them. Because of this I like to save the northern edge of my bed for peas.
2) Radish: another crop that prefers cool soil to warmer soil. Plant seeds 1/2-1” apart in rows that are 2-4” apart. These grow fast! So I like to make extra use of space and plant in between my carrot rows. You will have eaten them all by the time the carrots are starting to fill in!
3) Carrots: plant now for a summer harvest! Plant about 1/2-1” apart in rows about 12” apart. Thin to 1” apart once seedlings germinate. Be patient - germination often takes 1-3 weeks and may be closer to 3 in cooler temps.
4) Spinach: a SUPER cold hardy crop and grows best in the spring or fall when temperatures are low. Leaves can freeze and then thaw when the sun warms them. Sow as soon as the soil can be worked. For baby salad leaves plant 60 seeds per foot in rows 2-4 inches apart. Harvest outer leaves when they reach the size you most prefer for salad.
5) Kale: baby kale can be planted for continuous cutting as soon as the soil can be worked. Plant 60 seeds per foot, 2-4 inches between each row. Once you have salad sized leaf, you can cut baby leaves for salad. Cut outer leaves, so the inside ones can continue to grow for continuous production.
Yay! Now you’ll be harvesting a full salad in no time!
Be forewarned: germination time may take longer in cooler temperatures. Be patient and keep beds moist but not drenched.
Comment below and tell me what your favorite early season veggie is!
Happy Gardening!